There are so many benefits of using a VPN (Virtual Private Network), some of which include keeping you safe on the internet by encrypting your traffic and helping you to access blocked content/sites/web applications from anywhere anonymously.
In this article, you will learn how to quickly and automatically set up your own IPsec/L2TP VPN server in RHEL-based distributions (Rocky Linux and Alma Linux) and Debian-based distributions (Ubuntu and Mint).
Prerequisites:
A fresh RHEL-based or Debian-based VPS (Virtual Private Server) from any provider.
Recommended VPS Providers:
- DigitalOcean – Starting at $4/month, includes $200 in credits for 60 days for new users.
- Linode (Akamai) – Starting at $5/month, includes $100 in credits for 60 days for new users.
Both providers offer reliable performance and excellent uptime for running VPN servers.
Setting Up an IPsec/L2TP VPN Server in Linux
To set up the VPN server, we will use a wonderful collection of shell scripts created by Lin Song, that installs Libreswan as the IPsec server, and xl2tpd as the L2TP provider. The offering also includes scripts to add or delete VPN users, upgrade the VPN installation, and much more.
First, log in to your VPS via SSH, then run the appropriate commands for your distribution to set up the VPN server. By default, the script will generate random VPN credentials (pre-shared key, VPN username, and password) for you and display them at the end of the installation.
Create VPN Credentials
However, if you want to use your own credentials, first you need to generate a strong password and PSK as shown.
openssl rand -base64 10
openssl rand -base64 16
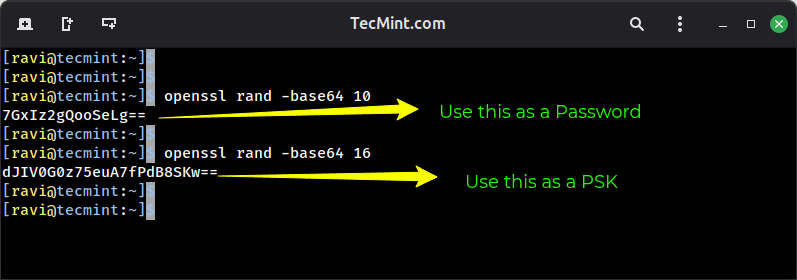
Next, set these generated values as described in the following command. All values MUST be placed inside ‘single quotes’ as shown.
- VPN_IPSEC_PSK –
'dJIV0G0z75euA7fPdB8SKw==' - VPN_USER –
'tecmint' - VPN_PASSWORD –
'7GxIz2gQooSeLg=='
On RHEL-based distributions such as Rocky Linux and Alma Linux, run:
wget https://git.io/vpnsetup-centos -O vpnsetup.sh && VPN_IPSEC_PSK='dJIV0G0z75euA7fPdB8SKw==' VPN_USER='tecmint' VPN_PASSWORD='7GxIz2gQooSeLg==' sh vpnsetup.sh
sudo bash vpnsetup.sh
On Debian-based distributions such as Ubuntu and Linux Mint, run:
wget https://git.io/vpnsetup -O vpnsetup.sh && VPN_IPSEC_PSK='dJIV0G0z75euA7fPdB8SKw==' VPN_USER='tecmint' VPN_PASSWORD='7GxIz2gQooSeLg==' sudo sh vpnsetup.sh
sudo bash vpnsetup.sh
The main packages that will be installed are bind-utils, net-tools, bison, flex, gcc, libcap-ng-devel, libcurl-devel, libselinux-devel, nspr-devel, nss-devel, pam-devel, xl2tpd, iptables-services, systemd-devel, fipscheck-devel, libevent-devel, and fail2ban (to protect SSH), and their respective dependencies.
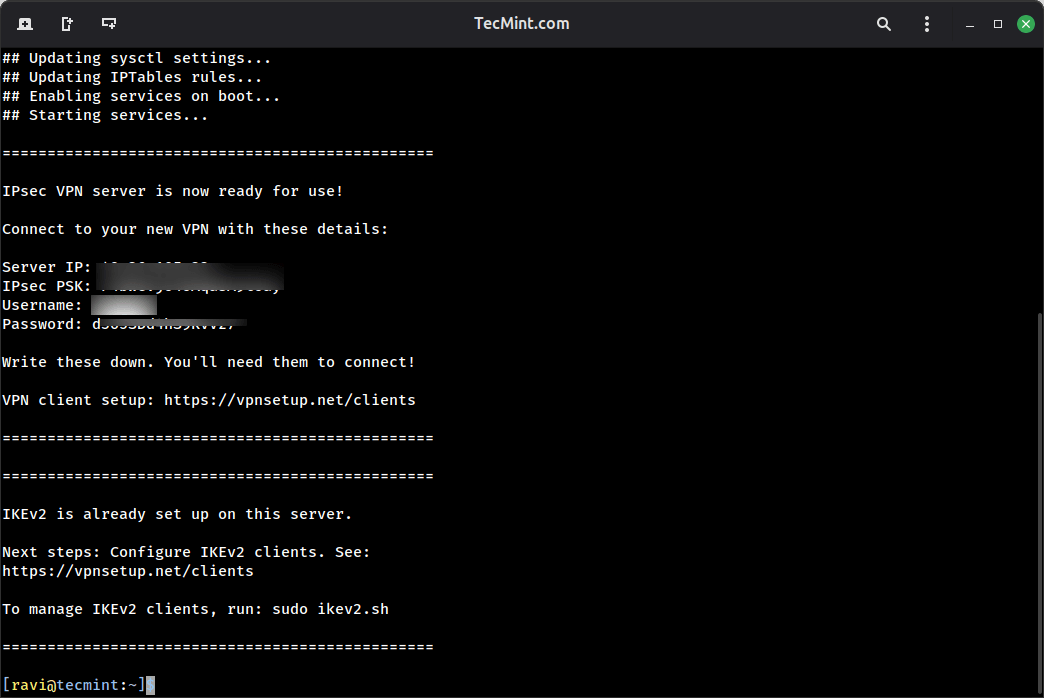
Then it downloads, compiles, and installs Libreswan from source, enables and starts the necessary services. Once the installation is complete, the VPN details will be displayed as shown in the following screenshot.
Next, you need to set up a VPN client for your desktops or laptops with a graphical user interface, refer to this guide: How To Setup an L2TP/Ipsec VPN Client on Linux.
To add the VPN connection in a mobile device such as an Android phone, go to Settings → Network & Internet (or Wireless & Networks → More) → Advanced → VPN and then select the option to add a new VPN. The VPN type should be set to IPSec Xauth PSK, then use the VPN gateway and credentials above.
Managing VPN Users in Linux
Once your VPN server is up and running, you’ll need to manage user access, such as how to add, modify, or remove VPN users on your Linux system.
Adding a New VPN User
To create a new VPN user or update an existing VPN user with a new password, download and use the add_vpn_user.sh script using the following wget command.
wget -O add_vpn_user.sh https://raw.githubusercontent.com/hwdsl2/setup-ipsec-vpn/master/extras/add_vpn_user.sh
sudo sh add_vpn_user.sh 'username_to_add' 'user_password'
Make sure to replace username_to_add with the desired username and user_password with a strong password.
For example:
sudo sh add_vpn_user.sh 'john_doe' 'SecurePass123!'
Removing a VPN User
To delete a VPN user, download and use the del_vpn_user.sh script.
wget -O del_vpn_user.sh https://raw.githubusercontent.com/hwdsl2/setup-ipsec-vpn/master/extras/del_vpn_user.sh
sudo sh del_vpn_user.sh 'username_to_delete'
For example, to remove the user we created earlier:
sudo sh del_vpn_user.sh 'john_doe'
How to Upgrade Libreswan Installation in Linux
You can upgrade the Libreswan installation using the vpnupgrade.sh or vpnupgrade_centos.sh script, but make sure to edit the SWAN_VER variable to the version you want to install, within the script.
Before that, make sure to check the latest version first from the Libreswan releases page and note down the version number.
Next, download the upgrade script file.
#On RHEL-based distros
wget https://git.io/vpnupgrade-centos -O vpnupgrade.sh

#On Debian-based distros
wget https://git.io/vpnupgrade -O vpnupgrade.sh
Before running the script, open it with the nano text editor:
nano vpnupgrade.sh
Look for the SWAN_VER variable near the top of the file and change it to your desired version:
SWAN_VER=5.3 # Change this to the version you want
Save and exit the editor, then run the upgrade script, which will download, compile, and install the specified Libreswan version.
sh vpnupgrade.sh
Uninstalling the VPN Server in Linux
If you need to completely remove your VPN server installation, follow these distribution-specific steps to cleanly uninstall all components and restore your system configuration.
Uninstalling VPN on RHEL
First, remove the xl2tpd package, which will remove the L2TP daemon, one of the core VPN components.
yum remove xl2tpd
Then, open the iptables configuration file.
sudo nano /etc/sysconfig/iptables
Look through the file and remove any VPN-related firewall rules, typically, rules that need to be removed are:
- Forward traffic for VPN connections.
- Allow IPsec ports (UDP 500, 4500).
- Allow L2TP port (UDP 1701).
Next, remove system configuration changes in the configuration files.
sudo nano /etc/sysctl.conf
sudo nano /etc/rc.local
Find and delete all lines that appear after the comment # Added by hwdsl2 VPN script. These lines typically control IP forwarding and other network parameters.
Uninstalling VPN on Debian/Ubuntu
First, purge the xl2tpd package, which will remove the package along with its configuration files, ensuring a cleaner uninstall.
sudo apt-get purge xl2tpd
Next, edit the main iptables rules file and remove any VPN-related firewall rules from these two files.
sudo nano /etc/iptables.rules
sudo nano /etc/iptables/rules.v4
Similarly, edit the startup configuration file /etc/rc.local and remove lines after # Added by hwdsl2 VPN script, but be careful not to remove the exit 0 line if it exists at the end of the file, which is a standard part of the rc.local script.
Complete Cleanup (Optional but Recommended)
To completely remove all VPN-related files and directories, run these commands:
sudo rm -f /etc/ipsec.conf* /etc/ipsec.secrets* /etc/ppp/chap-secrets* /etc/ppp/options.xl2tpd* /etc/pam.d/pluto /etc/sysconfig/pluto /etc/default/pluto
sudo rm -rf /etc/ipsec.d /etc/xl2tpd
Additional Resources
To set up a site-to-site IPSec-based VPN with Strongswan, check out our guides:
Reference: https://github.com/hwdsl2/setup-ipsec-vpn
At this point, your own VPN server is up and running. You can share any queries or give us feedback using the comment form below.