Nmap, short for Network Mapper, is an open-source and highly versatile tool used by Linux system and network administrators. It is commonly employed for network exploration, security scanning, auditing, and detecting open ports on remote machines.
Nmap can identify live hosts, determine operating systems, detect packet filters, and reveal open ports running on remote systems.
Nmap Command Usage
nmap [Scan Type(s)] [Options] {target specification}
How to Install NMAP in Linux
Most of today’s Linux distributions, like Red Hat, CentOS, Fedora, Debian, and Ubuntu, include Nmap in their default package management repositories (Yum or APT), which are used to install and manage software packages and updates.
To install Nmap on Linux, use the following appropriate command for your specific Linux distribution.
sudo apt install nmap         [On Debian, Ubuntu and Mint]
sudo dnf install nmap         [On RHEL/CentOS/Fedora and Rocky/AlmaLinux]
sudo emerge -a sys-apps/nmap  [On Gentoo Linux]
sudo apk add nmap             [On Alpine Linux]
sudo pacman -S nmap           [On Arch Linux]
sudo zypper install nmap      [On OpenSUSE]
sudo pkg install nmap         [On FreeBSD]
1. Check Open Ports and Services with Nmap
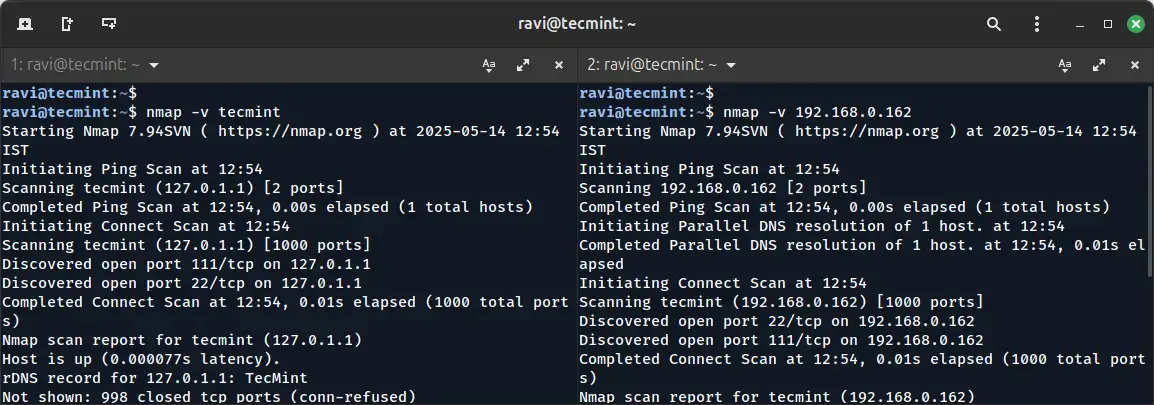
The Nmap tool offers various methods for scanning a system. In this example, a scan is performed using the hostname to identify all open ports, running services, and the system’s MAC address.
nmap tecmint
You can also scan a system by specifying its IP address instead of a hostname, which is useful in environments where DNS is not configured or when working within private networks.
nmap 192.168.0.162

2. Enabling Verbose Mode in Nmap
Using the -v option, will enable verbose mode, which provides more detailed output during the scan, which helps in understanding the scanning process and reveals additional information about the target system.
nmap -v [target IP or domain]
You can also scan multiple hosts by specifying their IP addresses or hostnames separated by spaces.
nmap 192.168.0.101 192.168.0.102 192.168.0.103
3. Scanning an Entire Subnet with Nmap
You can scan a whole subnet or IP range with Nmap by providing * wildcard with it.
nmap 192.168.0.*
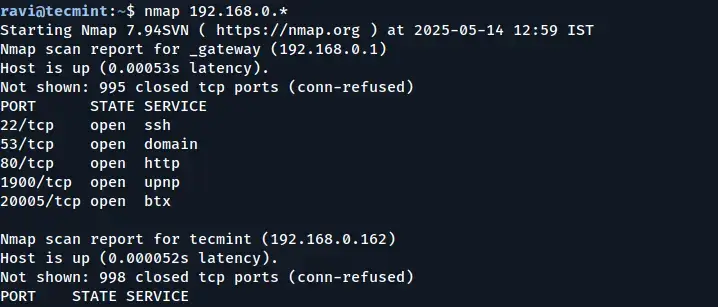
In the output above, you can see that Nmap scanned the entire subnet and displayed information about the hosts that are active (Up) on the network.
4. Scan Multiple Servers Using the Last Octet of IP Address
You can scan multiple IP addresses by simply specifying the last octet of the IP address. For example, the following command performs scans on the IP addresses 192.168.0.101, 192.168.0.102, and 192.168.0.103:
nmap 192.168.0.101,102,103
5. Scan a List of Hosts from a File in Nmap
If you have multiple hosts to scan and their details are listed in a file, you can instruct Nmap to read that file and perform the scans automatically.
Create a text file called nmaptest.txt and list all the IP addresses or hostnames of the servers you want to scan.
cat > nmaptest.txt
Next, run the following command with “iL” option with the nmap command to scan all the listed IP addresses in the file.
nmap -iL nmaptest.txt
6. Scan an IP Address Range with Nmap
You can specify a range of IP addresses to scan, which is useful when you want to scan multiple hosts within a network, rather than scanning them individually. By specifying an IP range, you can quickly gather information on all devices within that range.
For example, to scan a range of IP addresses from 192.168.0.101 to 192.168.0.110, you can use the following command:
nmap 192.168.0.101-110
This command will scan all IP addresses in the specified range: 192.168.0.101, 192.168.0.102, up to 192.168.0.110.
7. Scan Network Excluding Remote Hosts
The --exclude option allows you to skip scanning certain hosts that you don’t want to include in the results, which is particularly useful when you need to perform a wide-range scan but want to avoid scanning certain IP addresses for various reasons.
nmap 192.168.0.* --exclude 192.168.0.100
In this example, Nmap will scan the entire 192.168.0.0/24 subnet (all addresses from 192.168.0.0 to 192.168.0.255) but will exclude the host at 192.168.0.100 from the scan.
8. Scan OS Information and Perform Traceroute
With Nmap, you can detect the operating system (OS) and its version running on a remote host. Additionally, Nmap can perform traceroute and enable script scanning to gather even more detailed information about the host’s configuration.
To enable OS detection, version detection, script scanning, and traceroute, use the -A option.
nmap -A 192.168.0.162
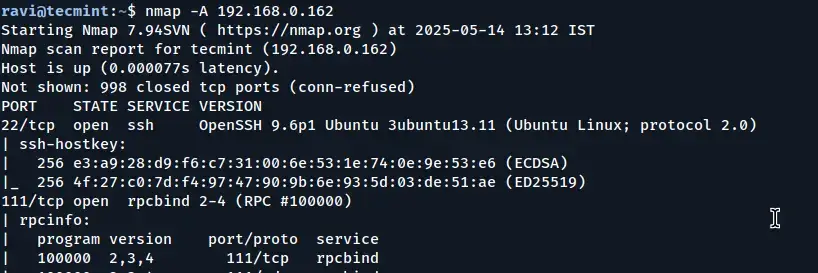
By using the -A option, you can gain a comprehensive understanding of the remote host, including its OS, services, network topology, and more, in a single scan.
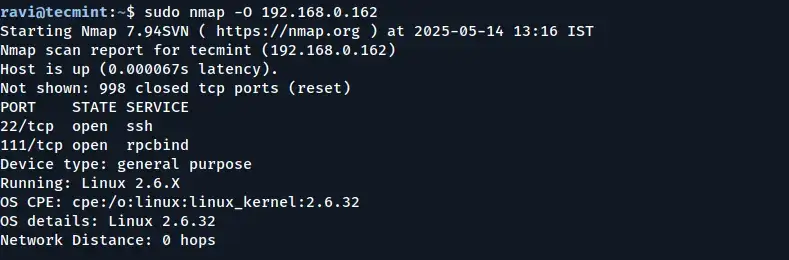
9. Enable OS Detection with Nmap
To detect the operating system (OS) of a remote host, use the -O option. Additionally, the --osscan-guess option can help make more accurate guesses about the OS when the detection is uncertain.
sudo nmap -O [target IP or domain]
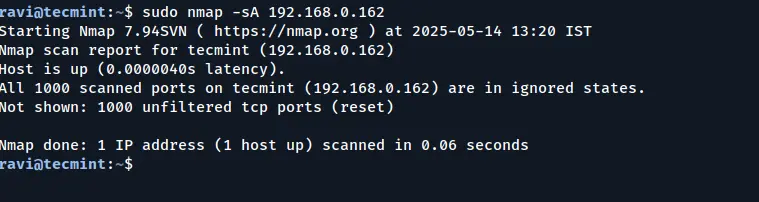
10. Scan a Host to Detect a Firewall
The -sA option instructs Nmap to use an Acknowledgment Scan to identify filtering devices that may be in place. This type of scan sends packets with the ACK flag set and analyzes the response to determine if the host is behind a firewall or using packet filtering.
nmap -sA 192.168.0.162
11. Scanning for Firewall Protection on a Host
You can scan a host to determine whether it is protected by a firewall or packet filtering software by bypassing the host’s ping checks.
The -PN (no ping) option skips the host discovery phase, assuming the host is up and directly scanning it, even if it is behind a firewall that might block ICMP (ping) requests.
nmap -PN 192.168.0.162
12. Find Live Hosts in a Network
The “-sP” option allows you to quickly identify which hosts are live (i.e., currently online and responsive) within a specified network.
nmap -sP 192.168.0.*
In this example, Nmap scans all IP addresses in the 192.168.0.* range to identify which ones are up and responsive.
13. Quick Scanning with the Nmap
You can perform a fast scan using the -F option, which instructs the tool to scan a predefined set of ports listed in the nmap-services file. This scan focuses on a smaller subset of commonly used ports, allowing it to complete faster than a full scan of all ports.
nmap -F 192.168.0.162
By using the -F option, you can quickly get an idea of the most common open ports on a target machine without waiting for a full scan of all ports to complete.
14. Find the Nmap Version
To find out which version of Nmap you are running on your machine, use the -V option, which will display the current version of Nmap installed, along with additional version-related information.
nmap -V
15. Scanning Ports in Sequential Order
Use the -r flag to disable randomizing the order of ports, ensuring that ports are scanned consecutively in ascending order.
By default, Nmap randomizes the order in which it scans ports to avoid detection by intrusion detection systems or firewalls.
However, using the -r option forces Nmap to scan the ports in the order they appear on the target machine.
nmap -r 192.168.0.162
16. Print Host Interfaces and Routing Information
The --iflist option, provides details on the network interfaces and the associated routing information of the system you are scanning, which can be helpful for network diagnostics, determining active network interfaces, and understanding the routing paths between different network segments.
nmap --iflist
This command outputs a list of all available interfaces on the system, along with their respective IP addresses and routing details.
17. Scanning Specific Ports with Nmap
Nmap offers several options for discovering open ports on a remote machine. By default, Nmap scans only TCP ports, but you can specify the particular port or range of ports you want to scan using the -p option.
For example, if you want to scan port 80 (the HTTP port) on a remote system, you can use the following command:
nmap -p 80 server2.tecmint.com
18. Scan a Specific TCP Port
Nmap allows you to scan specific port numbers and types (such as TCP or UDP) rather than scanning all ports. By default, Nmap scans TCP ports, but you can explicitly define which TCP port(s) to target, which is useful when you’re only interested in checking the status of a particular service.
For example, to scan TCP port 80 (commonly used for HTTP), you can use:
nmap -p 80 [target IP or domain]
You can also scan multiple ports by separating them with commas:
nmap -p 22,80,443 [target IP or domain]
Or scan a range of ports:
nmap -p 1-1000 [target IP or domain]
19. Scan a Specific UDP Port
To scan UDP ports, use the -sU option with Nmap. Unlike TCP, UDP scanning is slower and more difficult to interpret due to the stateless nature of the UDP protocol.
However, it is essential for identifying services like DNS, SNMP, and DHCP that operate over UDP.
sudo nmap -sU -p 53 server2.tecmint.com
20. Identify Service Versions Running on a Host
You can determine the version numbers of services running on a remote host by using the -sV option, which will enable version detection, which probes open ports to identify the application name and version number of the services running on those ports.
nmap -sV [target IP or domain]
21. Finding Live Hosts When ICMP Is Blocked
In some cases, remote hosts are protected by firewalls that block standard ICMP ping requests (such as those used in a typical ping scan with -PE).
When ICMP is filtered, Nmap’s default host discovery may fail to detect whether a system is up. To work around this, you can use TCP SYN (-PS) or TCP ACK (-PA) probes to perform host discovery using TCP packets instead of ICMP.
Example: Using TCP SYN Probes
nmap -PS 192.168.0.101
Example: Using TCP ACK Probes
nmap -PA 192.168.0.101
You can also specify the port number(s) to use with these options:
nmap -PS22,80,443 192.168.0.101
nmap -PA22,80,443 192.168.0.101
22. Perform a Stealthy Scan with Nmap
The -sS option initiates a TCP SYN scan, commonly referred to as a “stealth scan“; such a scan is called stealthy because it doesn’t complete the full TCP handshake, making it less likely to be logged by the target system’s intrusion detection systems (IDS).
nmap -sS 192.168.0.101
23. Scanning Commonly Used Ports with TCP Connect Scan
You can use option -sT to check for the most commonly used TCP ports on a target host, which is often used when SYN scans are not permitted (e.g., when not running as root), as it completes the full TCP handshake with each port.
nmap -sT 192.168.0.101
24. Performing a TCP Null Scan to Evade Firewall Detection
The -sN option initiates a TCP Null scan, which sends TCP packets with no flags set (i.e., none of SYN, FIN, RST, PSH, ACK, or URG), which is non-standard and can confuse poorly configured firewalls or intrusion detection systems (IDS).
The goal of this technique is to bypass standard filtering mechanisms and analyze how the target system responds to ambiguous packets.
nmap -sN 192.168.0.101
Conclusion
With these techniques, you should now have a solid foundation in using Nmap for network exploration and security scanning. Whether you are scanning for open ports, detecting services, or identifying firewalls, Nmap provides powerful capabilities that can help you assess and secure your network.
I encourage you to experiment with these commands in your own environment and test out different Nmap options. If you have any questions or would like to share your experiences, please leave a comment below. Stay tuned for more creative Nmap techniques in the second part of this series!