Since computers are connected to each other, services are growing rapidly, with examples such as email, social media, online shopping, chat, and web conferencing.
However, this connectivity is a double-edged sword, as it also opens the door for malicious activity, including the transmission of viruses, malware, and trojan apps, which can harm computers.
Why You Should Install a Firewall
The Internet, as the largest computer network, is not always filled with good people; therefore, to ensure our computers and servers are safe, we need to protect them.
One essential component for securing computers or servers is a firewall, which, according to Wikipedia, is:
In computing, a firewall is a software or hardware-based network security system that controls the incoming and outgoing network traffic by analysing the data packets and determining whether they should be allowed through or not, based on an applied rule set.
Iptables is a widely used firewall for servers, managing incoming and outgoing traffic based on a set of rules, allowing only trusted connections. However, IPTables runs in console mode and can be complicated for beginners.
UFW: A Simpler Alternative to IPTables
To reduce the complexity of setting up IPTables, many front-ends have been developed. If you’re using Ubuntu or Debian, you’ll find UFW (Uncomplicated Firewall) as the default firewall tool.
UFW (Uncomplicated Firewall) is a front-end for the widely used IPTables firewall, which provides a framework for managing netfilter and includes a command-line interface for controlling the firewall.
UFW is designed to be easy to use for beginners who may not be familiar with firewall concepts. At the same time, it allows advanced users to configure complex rules using the CLI.
UFW is available in distributions like Debian, Ubuntu, and Linux Mint.
Installing UFW Firewall
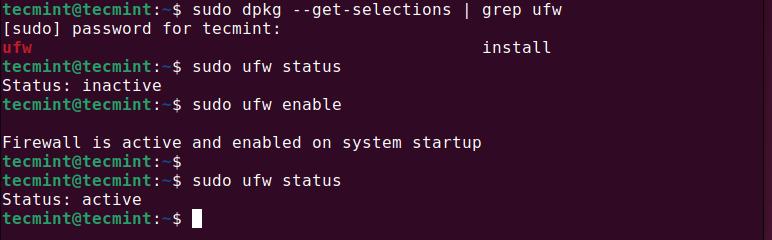
Before using UFW, you need to check if it’s already installed on your system using the following command, which will list all installed packages and filter the results to show if UFW is installed or not.
sudo dpkg --get-selections | grep ufw
If UFW is not installed, you can easily install it by running:
sudo apt install ufw
Once UFW is installed, it’s important to check its current status to see if it’s enabled or disabled.
sudo ufw status
If UFW is inactive, you need to enable it to start protecting your system.
sudo ufw enable
If you ever need to disable UFW, you can do so using the following simple command.
sudo ufw disable
Listing the Current UFW Rules
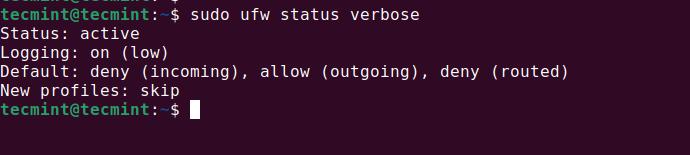
Once your firewall is activated, you can begin adding custom rules to control the incoming and outgoing traffic. To check the current status of your firewall and view the rules that are in place (including the default settings), you can use the following command:
sudo ufw status verbose
Explanation of the Output:
Status: active: This means the firewall is currently active and enforcing the rules you’ve set.Logging: on (low): This means the firewall will log basic events, such as when a packet is allowed or blocked.deny (code): This means no external connections can access your system unless explicitly allowed by a rule you add.allow (outgoing): This means your system can freely connect to external servers, like accessing websites or sending emails.deny (routed): This indicates that traffic routed through your system (i.e., traffic not directly originating from your machine) will be blocked by default.New profiles: skip: This setting skips automatic rule additions for new software profiles, and any newly installed application will require manual intervention to add firewall rules.
How to Add UFW Rules
By default, UFW is set to deny all incoming connections and allow all outgoing connections, which is a good security practice because it prevents unauthorized access while still allowing your computer to connect to the internet.
However, if you want to remotely access your machine, for example, using SSH, you’ll need to explicitly allow the appropriate port.
Allowing SSH Access
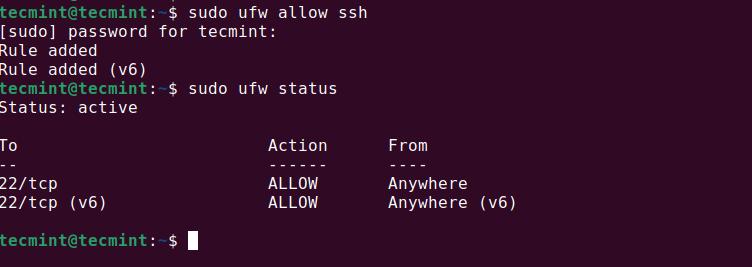
To allow incoming SSH connections (which use port 22), run the following command, which will allow incoming connections on port 22 for both IPv4 and IPv6.
sudo ufw allow ssh
You can check whether the rule was added successfully using:
sudo ufw status
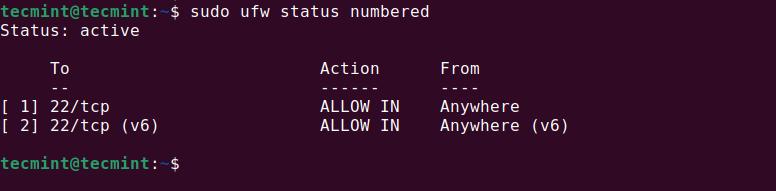
Listing Rules with Numbers
If you have many rules and want to manage them more easily, you can use the numbered option to list them:
sudo ufw status numbered
Allowing TCP Only
By default, allowing a service like SSH enables both TCP and UDP protocols, but SSH uses only TCP, so you can make the rule more specific by allowing only TCP connections:
sudo ufw allow ssh/tcp
Denying Access
Just like allowing access to specific services or ports, UFW also lets you deny traffic using a very similar command structure. Denying access is important when you want to explicitly block a certain service or connection from reaching your system.
Let’s say you want to block FTP (which typically runs on port 21) from being accessed on your machine.
sudo ufw deny ftp
You can also use a custom port or IP with the same deny syntax:
sudo ufw deny from 192.168.1.10 to any port 21
This rule will block only the specific IP 192.168.1.10 from accessing port 21.
Adding a Specific Port
Sometimes, services on your machine might run on non-standard or custom ports. For example, by default, SSH runs on port 22, but for security reasons, many administrators change this port to something else, like 2290.
To allow traffic through this custom port (2290), you can run the following command:
sudo ufw allow 2290
Allowing a Range of Ports
In some cases, you may want to open multiple ports at once, for example, if you’re running a service that uses a range of ports for communication, like certain game servers or VoIP applications.
To allow a range of ports using the TCP protocol:
sudo ufw allow 2290:2300/tcp
To allow the same range using the UDP protocol:
sudo ufw allow 2290:2300/udp
When you’re specifying a port range, you must also specify the protocol (tcp or udp). If you don’t, you’ll get an error like this:
ERROR: Must specify 'tcp' or 'udp' with multiple ports
Adding Rules for Specific IP Addresses
So far, we’ve added rules based on services and ports, but it also allows you to control access based on IP addresses, which is useful if you want to restrict access to only certain machines on your network.
Allow Access From a Single IP
To allow a specific IP address (e.g., 192.168.0.104) to access any service, use:
sudo ufw allow from 192.168.0.104
Allow Access From a Subnet
You can also allow access from an entire IP range or subnet. For example, to allow access from any device in the 192.168.0.0/24 range:
sudo ufw allow from 192.168.0.0/24
Specifying Destination Port (To)
You can also add rules that control where traffic is allowed to go, not just where it’s coming from. For example, if you want to allow SSH access (port 22) from anywhere, you’d write:
sudo ufw allow to any port 22
Combining IP, Protocol, and Port
For even more precise control, you can combine all the parameters. For example, allow only TCP traffic from IP 192.168.0.104 to port 22:
sudo ufw allow from 192.168.0.104 proto tcp to any port 22
Deleting UFW Rules
At some point, you may need to delete existing firewall rules — whether it’s for troubleshooting, cleaning up old configurations, or changing access permissions. Luckily, UFW makes this easy.
Let’s go through two common methods to remove rules.
Example Scenario
Let’s say your current firewall rules look like this:
To       Action    From
--       ------    ----
22/tcp   ALLOW     192.168.0.104
21/tcp   ALLOW     Anywhere
21/tcp   ALLOW     Anywhere (v6)
In this case:
- Port 22/tcp (SSH) is allowed only from IP 192.168.0.104
- Port 21/tcp (FTP) is allowed from anywhere
Method 1: Delete by Service or Port
If the rule was added using a service name like ftp, you can delete it with the same syntax:
sudo ufw delete allow ftp
This method does not ask for confirmation. Once you hit enter, the rule is deleted immediately.
Method 2: Delete by Rule Number
Sometimes, deleting a rule using the service name or port doesn’t work, especially when the rule was added with specific conditions (e.g., allowed only from a particular IP).
You might see this error:
Could not delete non-existent rule
Could not delete non-existent rule (v6)
In such cases, the best option is to delete the rule by its number.
Step 1: List Rules with Numbers
sudo ufw status numbered
Example Output:
To         Action    From
--         ------    ----
[1] 22/tcp  ALLOW     192.168.0.104
[2] 21/tcp  ALLOW     Anywhere
[3] 21/tcp  ALLOW     Anywhere (v6)
Step 2: Delete the Rule by Its Number
To delete the first rule (SSH access from 192.168.0.104), run:
sudo ufw delete 1
You’ll see:
Deleting:
 allow from 192.168.0.104 to any port 22 proto tcp
Proceed with operation (y|n)? y
How to Reset UFW Rules
At times, you might want to completely reset your firewall configuration, for example, if you’ve added too many rules and things have become messy or you want to start fresh.
To reset all UFW rules and return everything to its default state, use the following command:
sudo ufw reset
You’ll see a prompt like this:
Resetting all rules to installed defaults. Proceed with operation (y|n)? y
If you press y, UFW will do the following:
- Backup your existing rules before removing them.
- Delete all user-defined rules.
- Restore UFW settings to the installed defaults.
- Disable the firewall automatically after the reset.
After a reset, UFW is turned off, you’ll need to enable it again using:
sudo ufw enable
Advanced Functionality of UFW
As mentioned earlier, UFW is a front-end to the powerful IPTables firewall. While it’s designed to be simple, it’s also highly customizable behind the scenes.
UFW’s advanced configurations are handled through a series of plain text files. These files allow you to set up rules and options that go beyond what the UFW command-line tool can do. Here’s a quick overview:
Important UFW Configuration Files:
- /etc/default/ufw: The main configuration for default policies, IPv6 support, and kernel modules.
- /etc/ufw/before[6].rules: rules in these files are calculated before any rules added via the ufw command.
- /etc/ufw/after[6].rules: rules in these files are calculated after any rules added via the ufw command.
- /etc/ufw/sysctl.conf: kernel network tunables.
- /etc/ufw/ufw.conf: sets whether or not ufw is enabled on boot and sets the LOGLEVEL.
Conclusion
UFW as a front-end to iptables surely makes an easy interface for the user. Users don’t need to remember complicated iptables syntax. UFW also uses ‘plain english‘ as its parameter.
Allow, deny, and reset are some of them. I believe that there are many more iptables front-ends out there. But ufw is one of the best alternatives for users who want to set up their firewall fast, easy, and of course, secure. Please visit ufw manual page by typing man ufw for more details.