A self-signed SSL certificate is a simple way to enable HTTPS on Apache without purchasing a certificate from a Certificate Authority (CA).
Many older tutorials still use a basic openssl req -x509 command to create a certificate. While that works, it often creates a certificate without a Subject Alternative Name (SAN) that modern web browsers such as Chrome and Firefox have required SAN support for years. Without it, visitors will see errors like ERR_CERT_COMMON_NAME_INVALID, even if the certificate’s Common Name appears correct.
In this guide, you’ll create a proper self-signed certificate using a san.cnf configuration file that includes SAN entries. You’ll then configure a complete Apache SSL VirtualHost for store.linuxapp.com and apply a few recommended TLS security settings. The same procedure also works on RHEL 10 and AlmaLinux 10.
Prerequisites
Before starting, make sure you have:
- Rocky Linux 10 is installed with a non-root sudo user.
- A domain name pointed to your server’s IP address (the guide uses
store.tecmint.comas the example). - Port 80 and 443 are accessible, or firewall rules you can modify.
Step 1: Install Apache and mod_ssl
Rocky Linux 10 already includes OpenSSL in the base operating system, so you don’t need to install it separately. What you do need is Apache (httpd) and the mod_ssl package, which adds SSL/TLS support to the web server.
sudo dnf install httpd mod_ssl -y
When mod_ssl is installed, it automatically creates a default SSL configuration file at:
/etc/httpd/conf.d/ssl.conf
Next, start Apache and configure it to launch automatically whenever the server boots:
sudo systemctl start httpd
sudo systemctl enable --now httpd
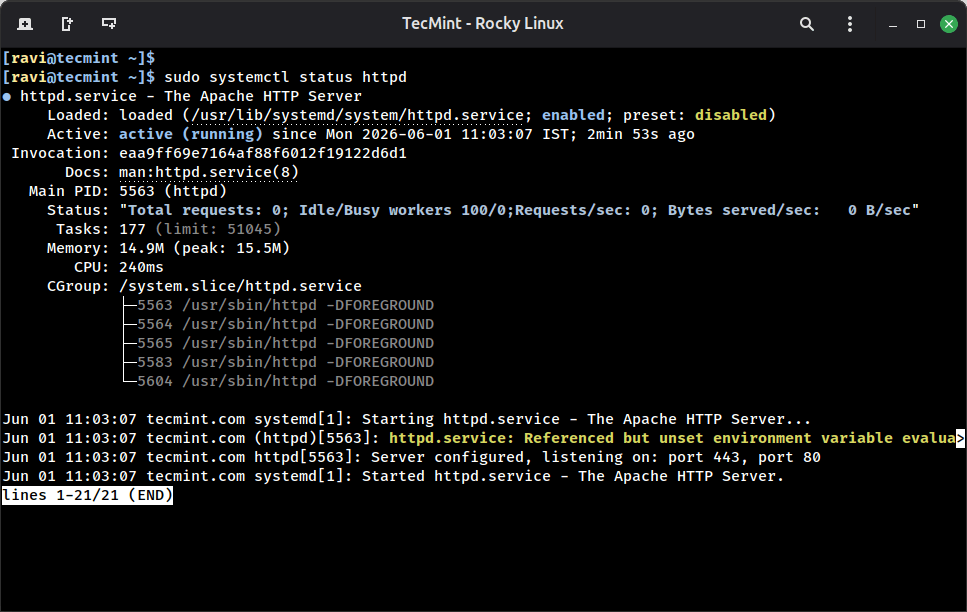
Now verify that Apache is running correctly:
sudo systemctl status httpd
Step 2: Open Ports 80 and 443 in the Firewall
Rocky Linux uses firewalld to control incoming network traffic. By default, only approved services and ports are allowed through the firewall.
Since Apache serves regular web traffic on port 80 (HTTP) and encrypted traffic on port 443 (HTTPS), both ports must be opened. Otherwise, visitors won’t be able to reach your website even if Apache is running correctly.
Run the following commands:
sudo firewall-cmd --permanent --add-service=http
sudo firewall-cmd --permanent --add-service=https
sudo firewall-cmd --reload
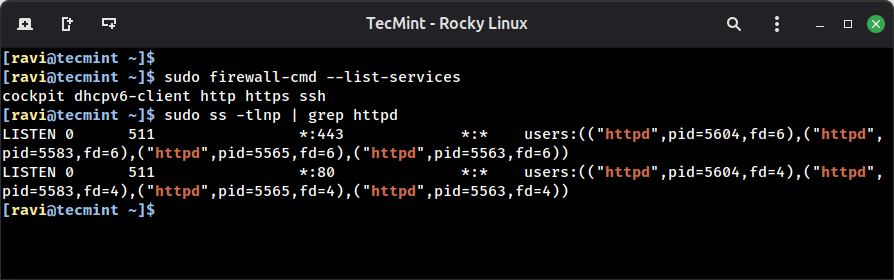
To verify that both services are allowed through the firewall, run:
sudo firewall-cmd --list-services
You can also confirm that Apache is listening on both web ports with:
sudo ss -tlnp | grep httpd
With the firewall ready, the next step is to create a proper self-signed SSL certificate with Subject Alternative Name (SAN) support.
Step 3: Create the OpenSSL Configuration File with SAN
A Subject Alternative Name (SAN) specifies the hostnames and IP addresses that a certificate is valid for and modern browsers no longer rely on the Common Name (CN) alone when verifying certificates.
If a certificate doesn’t contain a SAN entry, browsers such as Chrome, Firefox, and Edge will reject it with an error like:
ERR_CERT_COMMON_NAME_INVALID
First, create a directory to store the certificate, private key, and configuration file:
sudo mkdir -p /etc/ssl/store.linuxapp.com
Next, create the OpenSSL configuration file:
sudo vi /etc/ssl/store.linuxapp.com/san.cnf
Add the following contents:
[req]
default_bits       = 2048
prompt             = no
default_md         = sha256
distinguished_name = dn
x509_extensions    = v3_req

[dn]
C  = IN
ST = Maharashtra
L  = Mumbai
O  = LinuxApp
OU = IT
CN = store.linuxapp.com

[v3_req]
subjectAltName = @alt_names

[alt_names]
DNS.1 = store.linuxapp.com
DNS.2 = www.store.linuxapp.com
Here’s what the important sections do:
- [dn] contains the certificate identity information.
- CN (Common Name) specifies the primary hostname.
- [v3_req] enables certificate extensions.
- subjectAltName tells OpenSSL to use the entries defined in
[alt_names]. - DNS.1 and DNS.2 define the hostnames that browsers will trust for this certificate.
In this example:
store.linuxapp.comis the main website.www.store.linuxapp.comcovers the www version of the same site.
If your server uses a different domain name, replace every occurrence of store.linuxapp.com with your own hostname.
You can also add additional domains or subdomains by creating more entries:
[alt_names]
DNS.1 = store.linuxapp.com
DNS.2 = www.store.linuxapp.com
DNS.3 = api.store.linuxapp.com
DNS.4 = admin.store.linuxapp.com
For internal applications accessed by IP address, you can include IP-based SAN entries as well:
[alt_names]
DNS.1 = store.linuxapp.com
IP.1  = 192.168.1.100
Once you’ve finished editing the file, save it and exit the editor.
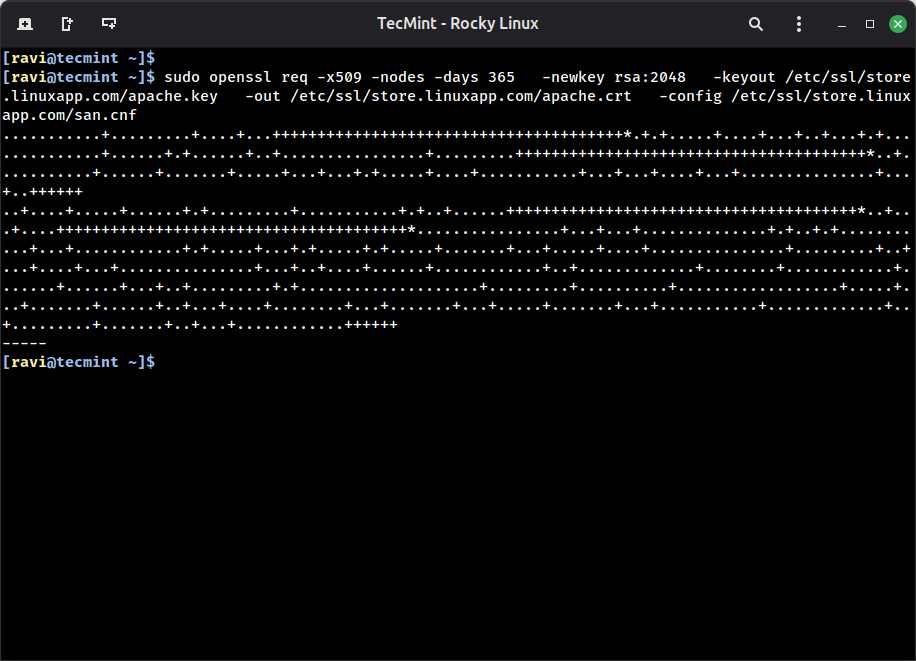
Step 4: Generate the Private Key and Self-Signed Certificate
Now that the san.cnf file is in place, you can generate both the private key and the self-signed certificate in a single command.
sudo openssl req -x509 -nodes -days 365
  -newkey rsa:2048
  -keyout /etc/ssl/store.linuxapp.com/apache.key
  -out /etc/ssl/store.linuxapp.com/apache.crt
  -config /etc/ssl/store.linuxapp.com/san.cnf
During the process, OpenSSL displays progress indicators while generating the RSA key.
After the command finishes, you’ll have two new files:
apache.key– Your private key.apache.crt– Your self-signed SSL certificate.
Next, you need to secure the private key, which is the most sensitive file in the entire setup, because if anyone can obtains it can impersonate your website.
sudo chmod 600 /etc/ssl/store.linuxapp.com/apache.key
sudo chmod 644 /etc/ssl/store.linuxapp.com/apache.crt
Verify both files exist with the right permissions.
ls -l /etc/ssl/store.linuxapp.com/
Output:
total 12
-rw-r--r--. 1 root root 1371 Jun  1 11:24 apache.crt
-rw-------. 1 root root 1704 Jun  1 11:24 apache.key
-rw-r--r--. 1 root root  334 Jun  1 11:24 san.cnf
Now verify that the SAN entries were actually embedded into the certificate.
openssl x509 -in /etc/ssl/store.linuxapp.com/apache.crt -text -noout | grep -A2 "Subject Alternative"
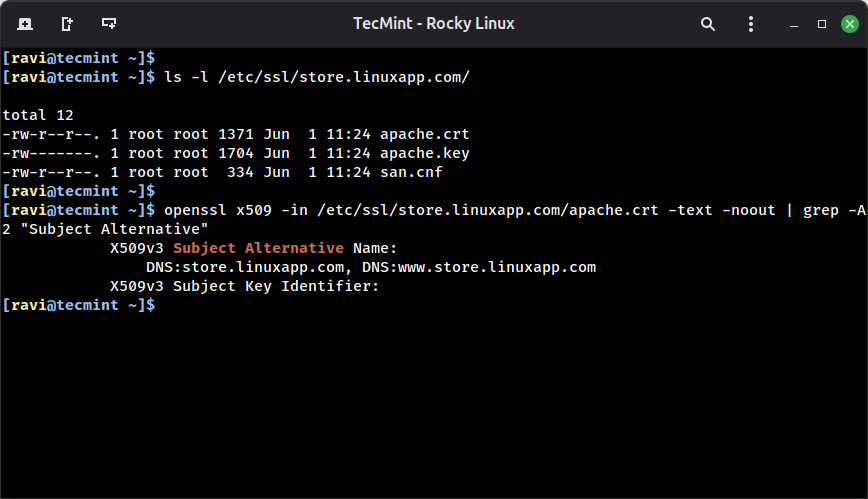
If you see your hostnames listed under Subject Alternative Name, the certificate was generated correctly.
If the SAN section is missing or empty, browsers such as Chrome and Firefox will reject the certificate with hostname validation errors, even if the Common Name (CN) matches the site name.
Step 5: Configure the Apache SSL VirtualHost
Although mod_ssl installs a default SSL configuration file (ssl.conf), it’s better to create a separate VirtualHost file for each website, which keeps your configuration organized and makes it easier to manage multiple sites on the same server.
Before configuring Apache, create a simple test website under your DocumentRoot directory so you have something to serve over HTTPS.
sudo mkdir -p /var/www/store.linuxapp.com
echo "<h1>store.linuxapp.com is running over HTTPS on Rocky Linux 10</h1>" | sudo tee /var/www/store.linuxapp.com/index.html
Now create a dedicated Apache configuration file:
sudo vi /etc/httpd/conf.d/store.linuxapp.com-ssl.conf
Add the following configuration:
<VirtualHost *:443>
    ServerName store.linuxapp.com
    ServerAlias www.store.linuxapp.com
    DocumentRoot /var/www/store.linuxapp.com

    SSLEngine on
    SSLCertificateFile    /etc/ssl/store.linuxapp.com/apache.crt
    SSLCertificateKeyFile /etc/ssl/store.linuxapp.com/apache.key

    SSLProtocol         -all +TLSv1.2 +TLSv1.3
    SSLHonorCipherOrder on
    SSLSessionTickets   off

    <Directory /var/www/store.linuxapp.com>
        Options -Indexes +FollowSymLinks
        AllowOverride All
        Require all granted
    </Directory>

    ErrorLog  /var/log/httpd/store.linuxapp.com-ssl-error.log
    CustomLog /var/log/httpd/store.linuxapp.com-ssl-access.log combined
</VirtualHost>
Save the file and exit the editor.
At this point, Apache knows where your website files are located and which SSL certificate to use.
Step 6: Add an HTTP to HTTPS Redirect
At this point, Apache is configured to serve HTTPS traffic on port 443. However, users may still access your site using an http:// URL or by simply typing the domain name into their browser.
To ensure all traffic is encrypted, create a second VirtualHost that listens on port 80 and automatically redirects visitors to HTTPS.
Create a new configuration file:
sudo vi /etc/httpd/conf.d/store.linuxapp.com.conf
Add the following configuration:
<VirtualHost *:80>
    ServerName store.linuxapp.com
    ServerAlias www.store.linuxapp.com

    Redirect permanent / https://store.linuxapp.com/
</VirtualHost>
Before reloading Apache, always verify that the configuration is free of syntax errors.
sudo apachectl configtest
If Apache finds a problem, it displays the configuration file and line number where the error occurred.
AH00526: Syntax error on line 12 of /etc/httpd/conf.d/store.linuxapp.com-ssl.conf
Correct any reported errors and run configtest again until you see Syntax OK.
Once the configuration passes validation, reload Apache to apply the changes without interrupting existing connections:
sudo systemctl reload httpd
You can confirm that Apache is listening for both HTTP and HTTPS connections with:
sudo ss -tlnp | grep httpd
Example output:
LISTEN 0      511                *:443             *:*    users:(("httpd",pid=6076,fd=6)
LISTEN 0      511                *:80              *:*    users:(("httpd",pid=6076,fd=4)
If you see entries for both 80 and 443, Apache is ready to serve HTTP requests and redirect them to HTTPS.
Step 7: Test the HTTPS Setup
With Apache reloaded and the SSL VirtualHost active, it’s time to verify that HTTPS is working correctly.
Add a Temporary Hosts Entry (Optional)
If your domain isn’t pointing to the server yet, add a temporary entry to the local machine you’re testing from.
Replace 192.168.1.10 with your server’s actual IP address, which allows your system to resolve the hostname locally without requiring a DNS record:
echo "192.168.1.10 store.linuxapp.com www.store.linuxapp.com" | sudo tee -a /etc/hosts
You can verify the hostname resolves correctly:
getent hosts store.linuxapp.com
Example output:
192.168.1.10 store.linuxapp.com
Test the HTTPS Connection
Since the certificate is self-signed, curl will not trust it by default, so use the -k option to bypass certificate validation during testing.
curl -kv https://store.linuxapp.com 2>&1 | grep -E "SSL|subject|issuer|Connected"
Example output:
* SSL connection using TLSv1.3 / TLS_AES_256_GCM_SHA384 / X25519MLKEM768 / RSASSA-PSS
*  subject: C=IN; ST=Maharashtra; L=Mumbai; O=LinuxApp; OU=IT; CN=store.linuxapp.com
*  issuer: C=IN; ST=Maharashtra; L=Mumbai; O=LinuxApp; OU=IT; CN=store.linuxapp.com
*  SSL certificate verify result: self-signed certificate (18), continuing anyway.
* Connected to store.linuxapp.com (192.168.122.247) port 443
Server: Apache/2.4.63 (Rocky Linux) OpenSSL/3.5.1
Verify the HTTP Redirect
Next, confirm that all HTTP traffic is being redirected to HTTPS.
curl -I http://store.linuxapp.com
Example output:
HTTP/1.1 301 Moved Permanently
Date: Mon, 01 Jun 2026 06:20:10 GMT
Server: Apache/2.4.63 (Rocky Linux) OpenSSL/3.5.1
Location: https://store.linuxapp.com/
Content-Type: text/html; charset=iso-8859-1
This confirms that visitors using an unencrypted URL are automatically redirected to the secure HTTPS version of the site.
Test in a Web Browser
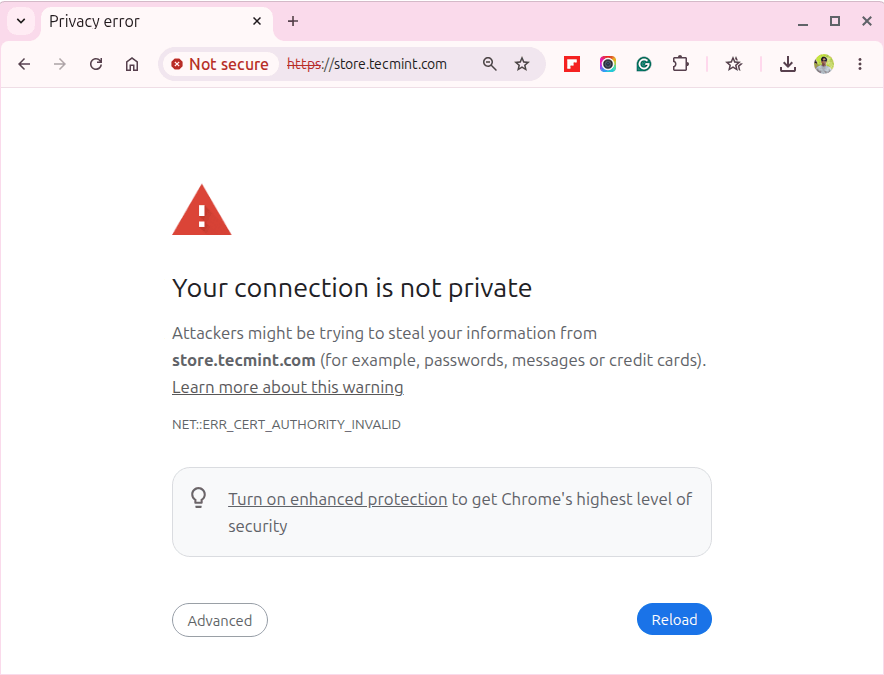
Open https://store.linuxapp.com in a browser, and you’ll see a certificate warning, which is expected since no recognized CA signed this cert, so click Advanced and proceed to confirm the page loads and the connection is encrypted.
A Note on Crypto Policies
One of the biggest advantages of Rocky Linux 10 is that you don’t have to spend much time tuning SSL/TLS settings manually. The distribution inherits RHEL 10’s system-wide cryptographic policy framework, which provides secure defaults for TLS-enabled applications such as Apache, Nginx, OpenSSH, and others.
The default policy, appropriately named DEFAULT, already disables outdated protocols and enforces modern cryptographic standards across the operating system.
You can check the currently active policy with:
sudo update-crypto-policies --show
With the DEFAULT policy active, Rocky Linux 10 enforces a minimum of TLS 1.2 and uses strong cipher suites by default. That means you don’t need to manually maintain long SSLCipherSuite strings in your Apache configuration just to achieve a secure baseline.
This is why the VirtualHost configuration in this guide only specifies:
SSLProtocol -all +TLSv1.2 +TLSv1.3
The operating system handles the lower-level cryptographic details, making SSL/TLS configuration simpler and more consistent.
Conclusion
In this guide, you installed Apache with SSL support, opened the required firewall ports, generated a self-signed certificate with proper Subject Alternative Name (SAN) entries, configured a dedicated HTTPS VirtualHost, and redirected all HTTP traffic to HTTPS.
The SAN verification step is particularly important because it’s what ensures modern browsers can validate the certificate correctly. Many older tutorials skip this step and end up producing certificates that browsers reject immediately.
For internal services, development environments, and lab systems, a self-signed certificate provides an easy way to enable encrypted HTTPS connections without relying on an external Certificate Authority.
When you’re ready to publish a site to the internet, you can swap in a trusted certificate from Let’s Encrypt while keeping the same Apache VirtualHost structure you’ve already built.