ifupdown system with a cleaner YAML-based approach that works across both server and desktop environments.Ubuntu 26.04 continues using Netplan as the default network configuration system, just like earlier Ubuntu releases, but instead of editing older configuration files manually, you now manage network settings using simple YAML files stored under /etc/netplan/.
For desktop users, Netplan usually works quietly in the background, but on VPS servers, home labs, or remote Ubuntu systems, knowing how to configure static IP addresses, DNS servers, and multiple interfaces becomes very important, because a small YAML mistake can even disconnect your server if you’re working remotely over SSH.
In this article, you’ll learn how to configure Netplan on Ubuntu 26.04, including DHCP, static IP addresses, DNS settings, and common troubleshooting tips that can save you during late-night server fixes.
How Netplan Works
Netplan configuration files are stored in /etc/netplan/ and use the .yaml extension as the file name, which controls the order they are loaded, so files are applied alphabetically, which means 00-installer-config.yaml loads before something like 01-custom.yaml.
On a fresh Ubuntu 26.04 system, the installer (subiquity) creates 00-installer-config.yaml with a simple DHCP setup. On cloud or VPS installations such as DigitalOcean, AWS, or Hetzner, you will usually see 50-cloud-init.yaml instead. That file is managed by cloud-init, so you normally avoid editing it directly.
When you run sudo netplan apply, Netplan reads all .yaml files in that directory and merges them into a single configuration. Then it generates the final network configuration under /run/systemd/network/ when using systemd-networkd, or passes it to NetworkManager depending on your setup.
You should never edit the generated files inside /run/ because they get overwritten on reboot or reapply. Always make changes in the original YAML files inside /etc/netplan/.
One common issue people run into is YAML formatting, because Netplan is strict about whitespace, and even a single tab can break the configuration, so always use spaces, usually 2 spaces per indentation level, and validate carefully before applying changes.
50-cloud-init.yaml directly never sticks, who’s been fighting that same reboot problemCheck Current Network Configuration
Before changing anything, it’s always a good idea to inspect your current network configuration, which helps you identify interface names and understand how Ubuntu currently connects to the network.
Run the following ip command to list available network interfaces:
ip addr show
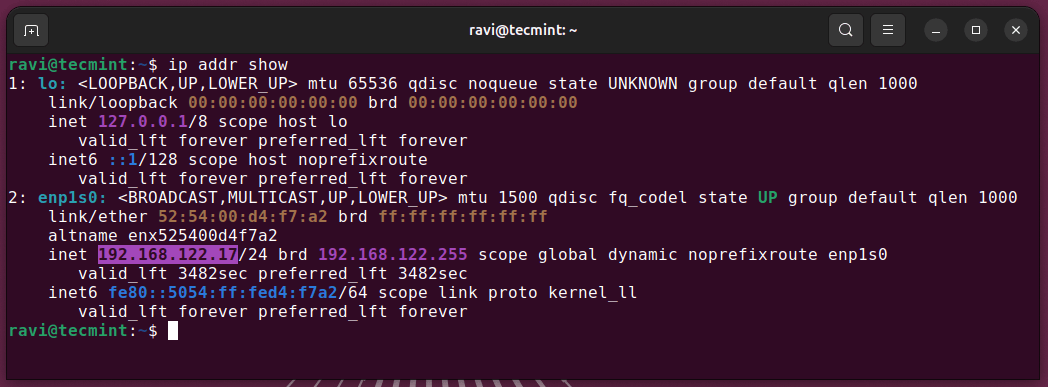
In the output above:
lois the local loopback interface.enp1s0is the active Ethernet adapter.192.168.122.17is the current IP address assigned through DHCP.
Desktop systems usually receive this IP from a router via DHCP, while cloud instances receive it from the provider’s virtual network.
Next, check the existing Netplan configuration files:
ls /etc/netplan/
On a bare-metal or local VM install, you’ll see the subiquity installer file:
00-installer-config.yaml
Or
50-cloud-init.yaml
This depends on whether you are on a cloud image or a standard Ubuntu installation.
/etc/network/interfaces files manually.Understanding 50-cloud-init.yaml on Ubuntu
On many VPS servers and cloud images, Ubuntu does not create the usual 00-installer-config.yaml file. Instead, networking is managed through cloud-init, which generates a file like 50-cloud-init.yaml.
This behavior is very common in environments such as VPS providers, virtual machines, and cloud templates. It means your network settings are being controlled automatically at boot time.
Run the following command to inspect it:
cat /etc/netplan/50-cloud-init.yaml
Expected output:
network:
  version: 2
  ethernets:
    enp1s0:
      dhcp4: true
This confirms DHCP is active, and your system is receiving an IP address automatically.
On desktop or VM installations, you may instead see an installer-generated file like:
# This is the network config written by 'subiquity'
network:
  ethernets:
    enp1s0:
      dhcp4: true
      dhcp6: true
      match:
        macaddress: 52:54:00:c2:ef:0c
      set-name: enp1s0
  version: 2
A common mistake is editing network settings without realizing cloud-init may overwrite them during reboot. That is why understanding this file is important before making changes.
Configure Static IP Address Using Netplan
A static IP means your server always keeps the same IP address instead of getting a new one every time it restarts, which is important for anything that needs to be reachable consistently, like a web server, database server, or a home lab machine.
Start by opening your Netplan configuration file.
sudo nano /etc/netplan/00-installer-config.yaml
Or
sudo nano /etc/netplan/01-netcfg.yaml
Now replace the contents with the following configuration and make sure to adjust the interface name, IP address, gateway, and DNS to match your network.
network:
  version: 2
  renderer: networkd
  ethernets:
    enp1s0:
      dhcp4: false
      addresses:
        - 192.168.1.100/24
      routes:
        - to: default
          via: 192.168.1.1
      nameservers:
        addresses:
          - 8.8.8.8
          - 1.1.1.1
What each part means:
dhcp4: false– This disables automatic IP assignment, which means instead of asking your router for an IP address, the system will always use the one you define.addresses– This is your static IP address written in CIDR format. For example,/24means your subnet mask is255.255.255.0, which is common in most home and office networks.routes– This defines where traffic should go when it is leaving your network. The via address is your router (default gateway). In newer Netplan versions like 1.2 on Ubuntu 26.04, the older gateway4 option is replaced by this routes format.nameservers.addresses– These are the DNS servers your system uses to convert domain names into IP addresses.8.8.8.8is Google DNS and1.1.1.1is Cloudflare DNS, both are fast and widely used.renderer: networkd– This tells Netplan to usesystemd-networkdas the backend. On server installations, this is usually the default, but specifying it makes your configuration more explicit and predictable.
Once you save the file, you can apply the changes using:
sudo netplan apply
Applying Configuration Safely with netplan try
Before applying any network changes on a remote server, use netplan try instead of jumping straight to netplan apply.
The reason is simple: netplan try applies the new settings temporarily and automatically rolls them back if you do not confirm them within 120 seconds, which is extremely useful when connected over SSH because a bad network configuration can instantly disconnect you from the server.
sudo netplan try
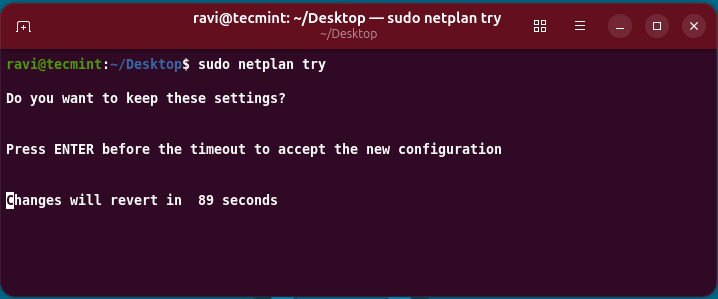
If your SSH session stays connected and networking works normally, press ENTER to keep the new settings permanently.
If something breaks, such as losing network access or SSH connectivity, do nothing and wait for the timeout. Netplan will automatically restore the previous working configuration for you, which is one of the safest habits you can develop when managing remote Linux servers.
Once you are confident the configuration is correct, you can apply it normally anytime using:
sudo netplan apply
If the command finishes without any output, the configuration was applied successfully.
If there is a mistake in the YAML file, Netplan will stop immediately and show the exact file name and line number where the error occurred, which makes troubleshooting much easier.
netplan try just saved you from a lockout on a remote server, who’s been applying network configs without a safety net.Verifying the Static IP
After applying the configuration, it’s a good idea to confirm that your interface received the new static IP address correctly.
ip addr show enp1s0
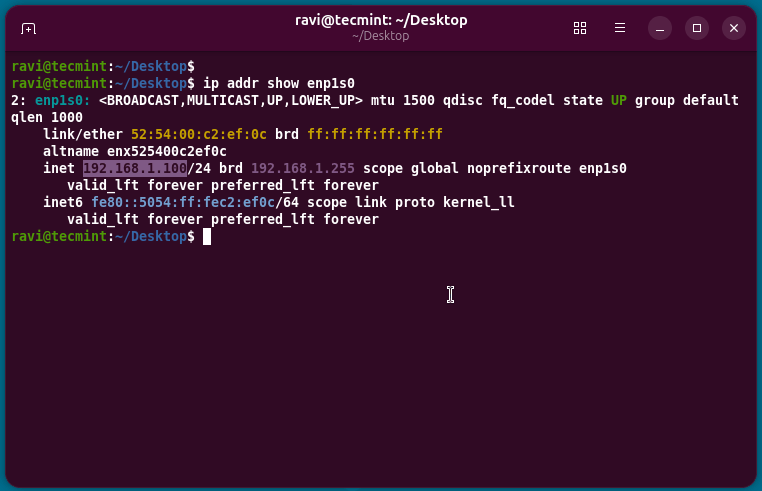
That confirms your interface is using the static IP address you configured.
You may also notice the following line, which tells you the address is permanent and not coming from DHCP. With DHCP-assigned addresses, you would normally see a lease timer counting down instead of forever.
valid_lft forever
Next, verify that the default gateway route is set correctly.
ip route show
Example output:
default via 192.168.1.1 dev enp1s0 proto static metric 20100
192.168.1.0/24 dev enp1s0 proto kernel scope link src 192.168.1.100 metric 100
This means your server knows to send outbound internet traffic through the router at 192.168.1.1.
If the default via line is missing, the system has no default gateway configured, which usually means there is a problem in the routes: section of your Netplan YAML file. Double-check the indentation and gateway IP address carefully.
Configuring Multiple DNS Servers
Netplan passes DNS settings to systemd-resolved, which is the service responsible for handling DNS lookups on Ubuntu systems.
You can configure multiple DNS servers for redundancy and also define search domains, which let you use short hostnames instead of typing full domain names every time.
Example configuration:
network:
  version: 2
  renderer: networkd
  ethernets:
    enp1s0:
      dhcp4: false
      addresses:
        - 192.168.1.100/24
      routes:
        - to: default
          via: 192.168.1.1
      nameservers:
        search:
          - corp.example.com
          - example.com
        addresses:
          - 192.168.1.53
          - 8.8.8.8
Search domains are especially useful in the office, home lab, or internal company networks where systems are often accessed using short names.
For example, with the above configuration:
ssh webserver
works the same as:
ssh webserver.corp.example.com
Your system automatically tries appending each search domain until it finds a match.
After applying the configuration, verify that the DNS settings were picked up correctly.
resolvectl status enp1s0
Example output:
Link 2 (enp1s0)
    Current Scopes: DNS
         Protocols: +DefaultRoute -LLMNR -mDNS -DNSOverTLS DNSSEC=no/unsupported
Current DNS Server: 192.168.1.53
       DNS Servers: 192.168.1.53 8.8.8.8
        DNS Domain: corp.example.com example.com
     Default Route: yes
If those values match your Netplan configuration, then systemd-resolved successfully loaded the settings from your YAML file.
Conclusion
You learned how Netplan works on Ubuntu 26.04 across both desktop systems and cloud VPS environments. You also worked with real configurations, including your system’s enp1s0 setup generated by subiquity, along with DHCP and static IP configurations.
A good next step is practicing Netplan on a local VM and then applying the same configuration on a cloud server to understand how behavior differs between environments.
Do you usually rely on DHCP for your desktop systems, or do you prefer setting static IPs for better control and consistency?