After the last tutorial on minimal installation of Red Hat Enterprise 9.4, it’s time to register your system to the Red Hat Subscription Service, enable your system repositories, and perform a full system update.
The subscription service is responsible for identifying registered systems and the products installed on them. The local Subscription Manager service tracks installed software products, and available and used subscriptions, and communicates with the Red Hat Customer Portal using tools like dnf and subscription-manager.
This tutorial guides you through tasks like registering a new RHEL 9.4 system, activating a subscription, enabling repositories, and performing a system update.
Step 1: Register and Active Red Hat Subscription
1. To register your system to Customer Portal Subscription Management use the following command followed by the credentials used to login to Red Hat Customer Portal.
subscription-manager register --username your_username --password your_password

NOTE: After the system is successfully authenticated an ID will be displayed on your prompt for your system.
2. To get a list of all your available subscriptions use the list switch and note down the Subscription Pool ID that you want to active on your system.
subscription-manager list -available
3. To activate a subscription use the Subscription Pool ID, but be aware that when purchasing one, it is valid for a specified period of time, so make sure you buy a new period of time before expiring.
Because this system is for tests, I only use the 30-day Self-Supported RHEL free subscription. To activate a subscription use the following command.
subscription-manager subscribe --pool=Pool ID number
Replace Pool ID number with the actual Pool ID of the subscription you want to use.
4. To get the status of your consumed subscriptions use the following command.
subscription-manager list --consumed
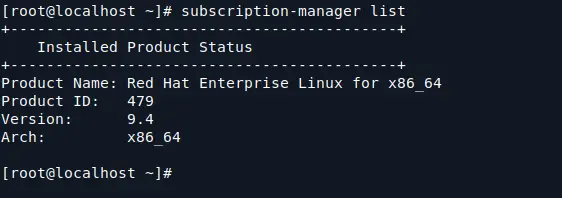
5. To check your enabled subscriptions use the below command.
subscription-manager list

6. If you want to remove all your active subscriptions use --all argument or just provide a subscription serial if you want to remove a specific pool only.
subscription-manager remove --all
subscription-manager unsubscribe --serial=Serial number
7. To list the available service levels on your RHEL system use the following command and if you want to set your desired level use the switch --set on service-level command.
subscription-manager service-level --list
subscription-manager service-level --set=self-support
Step 2: Enable Yum Repositories
8. After your system has been registered to Red Hat Customer Portal and a Subscription has been activated in your system you can start listing and enabling system Repositories.
To get a list of all your provided repositories through a certain subscription use the following command.
subscription-manager repos --list
NOTE: A long repositories list should appear and you can status to see if certain repositories are enabled (the ones with 1 on Enabled).
9. A more simple output the command yum repolist all should generate through, and you can, also, verify if certain repos are enabled.
yum repolist all
10. To view only the enabled system repositories use the following command.
yum repolist
11. Now if you want to enable a certain repo on your system, open /etc/yum.repos.d/redhat.repo file and make sure you change the line enabled from 0 to 1 on every specific repo you want to activate.
vi /etc/yum.repos.d/redhat.repo
NOTE: Here I’ve enabled RHEL 9 Server Optional RPMs repositories which I will need later to install some important PHP modules on a LAMP server.
12. After you edit the file and enable all your needed repositories using the procedure above, run yum repolist all or just yum repolist, again to verify the repos status like in the screenshots below.
yum repolist all
Step 3: Full Update RHEL 9
13. After everything concerning subscriptions and repositories has been set, upgrade your system to make sure your system has the latest packages, kernels, and security patches up to date, issuing the following command.
dnf update
That’s all! Now your system is up to date and you can start performing another important task like starting to build a complete web environment for productions by installing all the necessary software packages, which will be covered in future tutorials.


