March 6, 2023
VMware NSX Multi-tenancy; True Tenant Isolation?
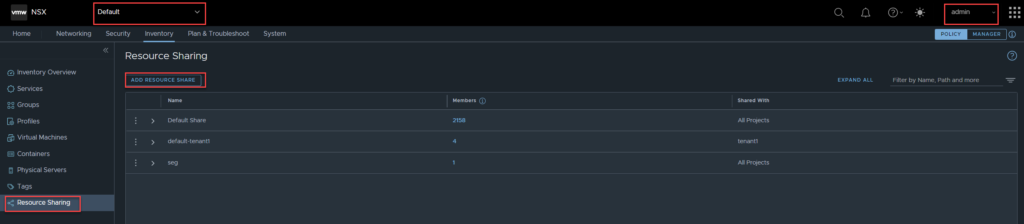
Navigate to Inventory, Resource Sharing, click on Add Resource Share.
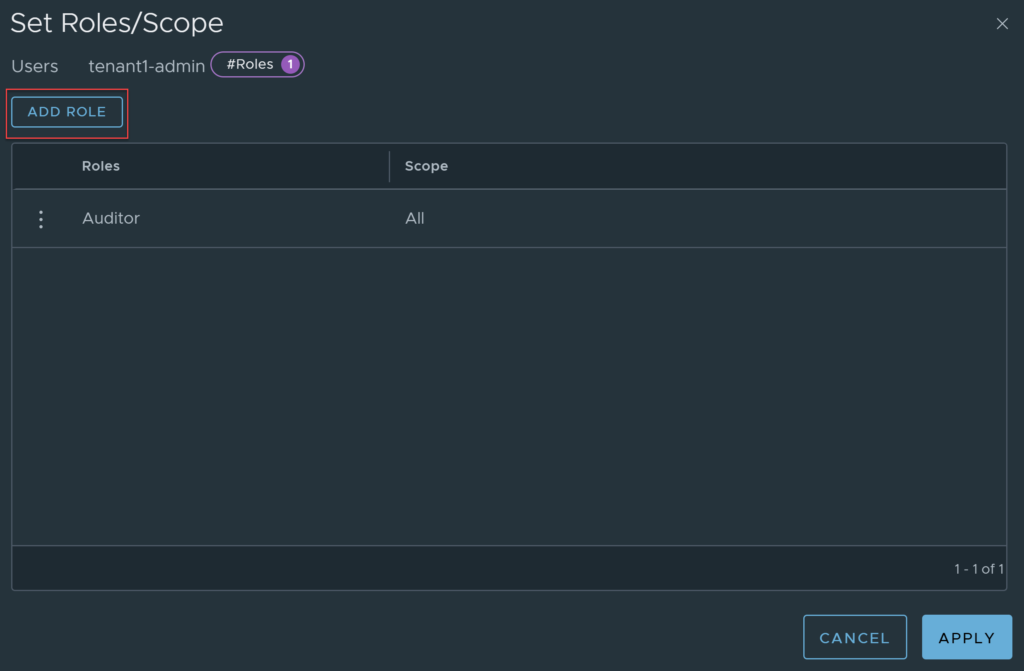
Next click on User Role Assignment and find the user you created in the list. Click on the three dots, select edit.
Notice that the Tier-0 gateway is not tagged with the tenant name, only the one created in the tenancy is. In this scenario, I will be attached the gateway to the Tier-1 gateway, not the Tier-0. Click save once you are done.
Topology and Design
You may be asking yourself, how does NSX know which VM’s and/or objects belong to each tenancy? If you think about it, NSX syncs with vCenter and gets its inventory that way, so how does it differentiate between the default org or the tenant?

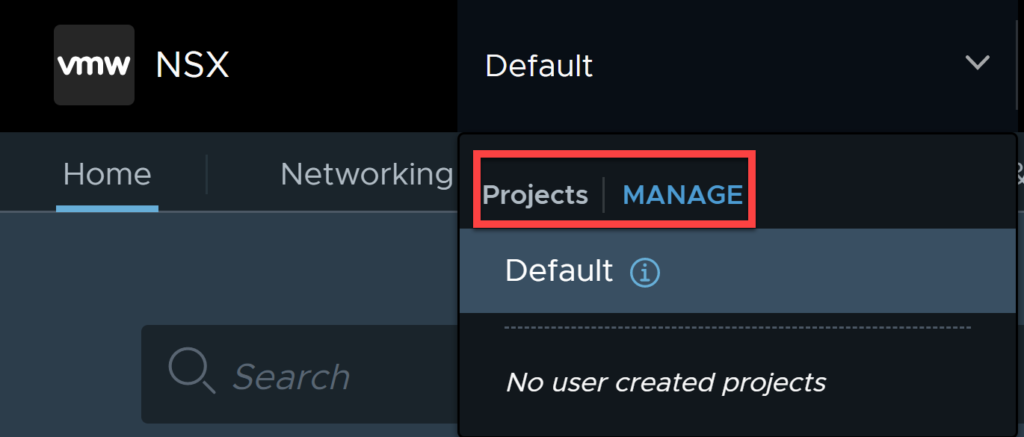
After you have clicked on the arrow, you will see the projects menu. Click on manage.
Related
VMware NSX 4.1 has come leaps and bounds for multi-tenancy, it effectively allows administrators to isolate their logical constructs from one another. There are some features missing, there definitely isn’t feature parity between the default org and a tenant. I found it quite easy to navigate and configure, it will be much simpler to do so in Greenfields, however, that does not mean it is not possible for brownfields.
Requirements and Supported Services
Requirements
Click on the 1 under roles.
It is no longer visible in the default org.
Supported Services
Click Save.
You will need to enter a user password, click save.
Configuring VMware NSX Multi-tenancy
Enter the share name, then click on set.
- Create a Tier-0 gateway, VRFs(if required), deploy Edges, create an Edge cluster, essentially a standard deployment. This step assumes that none of this exists yet.
- Create/ define project users
- Create a project, assign users
- Assign quotas if required
- Create required networking constructs
- Create / define required tags / groups / profiles / services
- Share any resources that are required from the default tenancy to projects
- Verify tenant isolation configuration
- Verify tenant specific alarms, logs, and operations
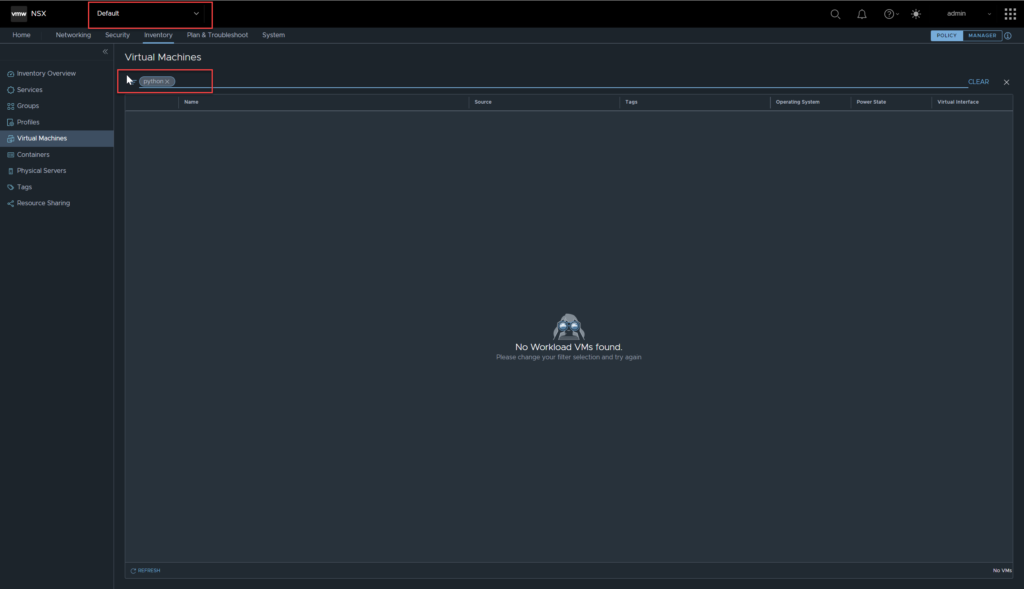
Similar to the Virtual Machines, you may also be asking what objects created in a tenancy can be seen in the default org. Let’s test with tags, navigate to Inventory, Tags, click Add Tag (in the tenant space). Add in the tag details then click save.
Create Project Users
The objects in the image below are currently supported to be shared with tenants.
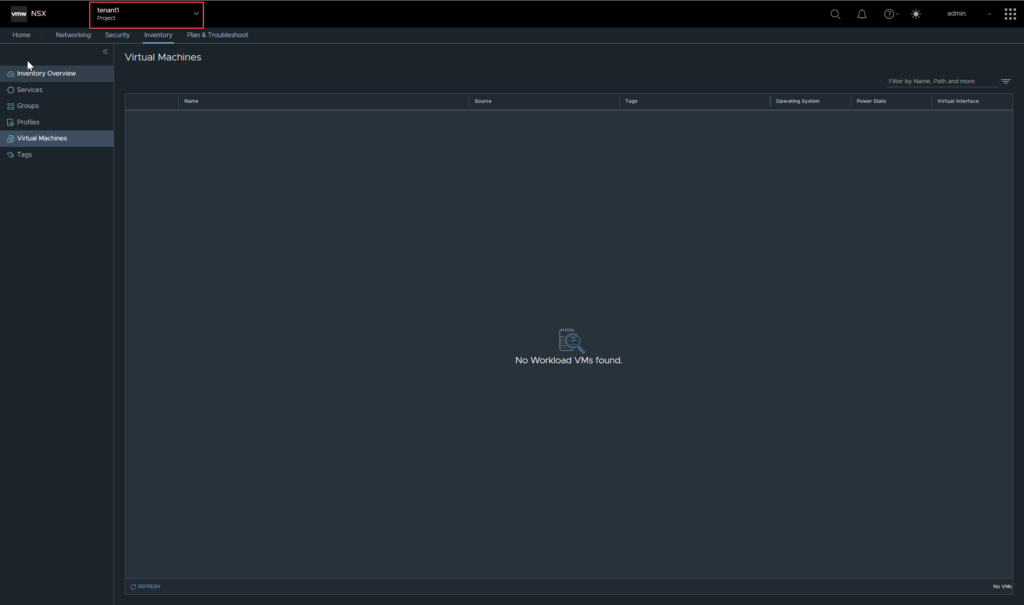
At this point, you are able to define these objects within the tenancy if you do not want to share resources or if they are going to be tenant specific. But you can’t create a virtual machine, so how do you get VM’s so show up? Simple, attach the required VMs in vCenter to the tenancy segment.
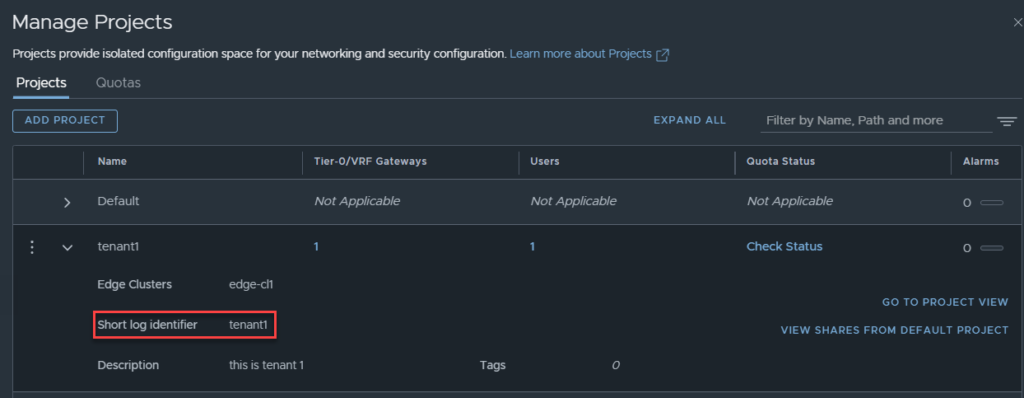
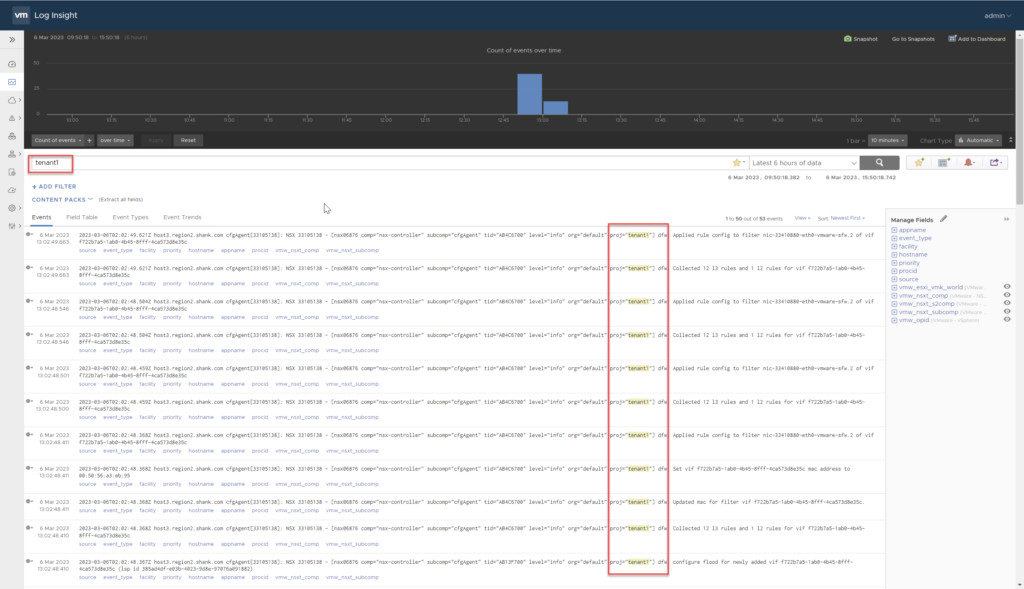
Filtering by the log identifier shows all log events for the project. This will be handy for troubleshooting purposes when you are required to track down events for a project specifically.

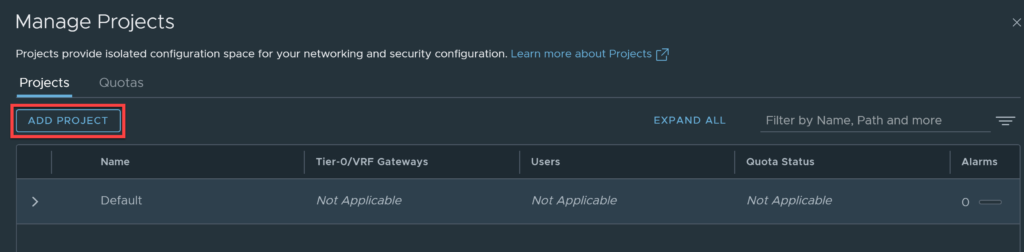
This screen is where you create projects, you will need to create a project on a per-tenant basis. In other words, if you require 10 tenants all requiring separation, create 10 projects. Click on Add Project.
This section will focus on tags and objects, however, DFW and GFW policy behaves in the exact same fashion.
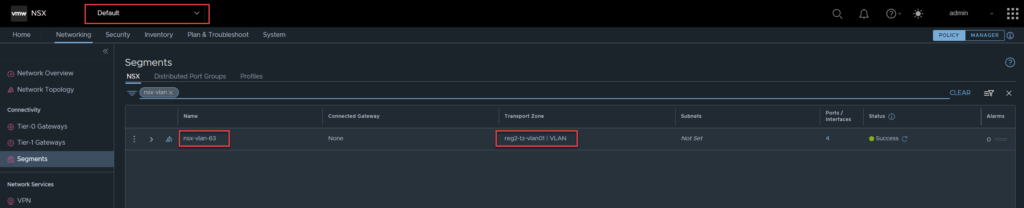
The administrator can share the VLAN backed segment with the tenant, for them to use as a service interface or whatever their use case may be.

Note: there doesn’t seem to be a mechanism to stop two tenancies creating a segment and assigning the same subnet. Which is likely by design (similar to AWS etc). I put together another article to deep-dive into the routing aspects of multi-tenancy.

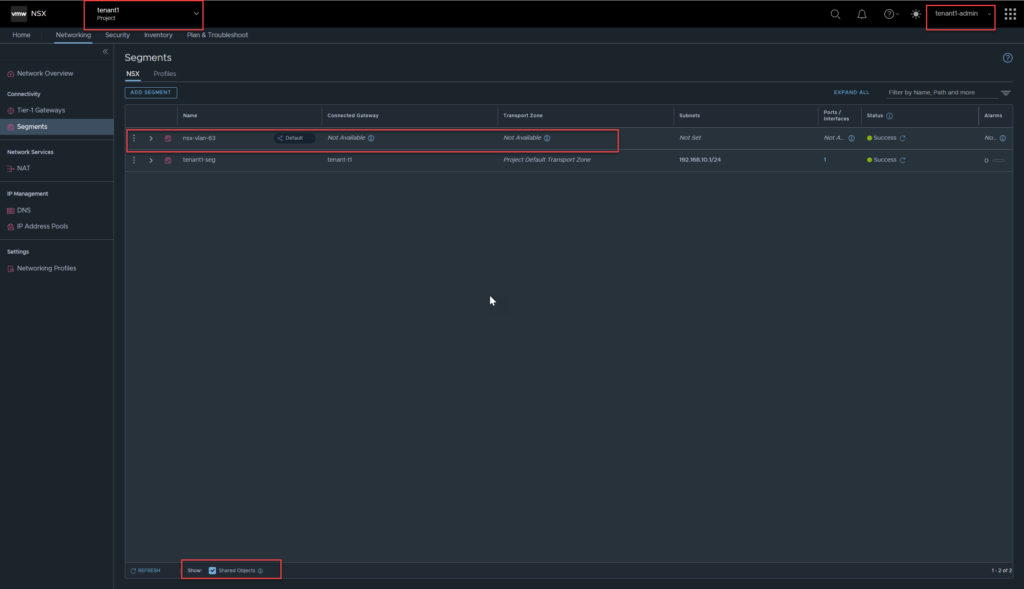
You can now see the shared segment, notice it has the default org tagged next to the name.
This section is a precursor to the remainder of this article, and is to provide a holistic view of VMware NSX multi-tenancy, objects, projects and how they all interact.
At this point, if you move into the tenant view for VM’s you will see none listed.

I use vRealize Log Insight (vRLI) in this environment for logging, below is an image from log insight using the search term ‘tenant1’.
Create the user/name you require and click save.
Create a Project
What is VMware NSX multi-tenancy? Historically multi-tenancy in VMware NSX was a Tier-0 gateway, otherwise known as the provider router, with one or many child Tier-1 gateways. Each Tier-1 gateway is created with a specific use-case; it could be for different customers, different environments, etc, the end goal is to provide tenancy segmentation.
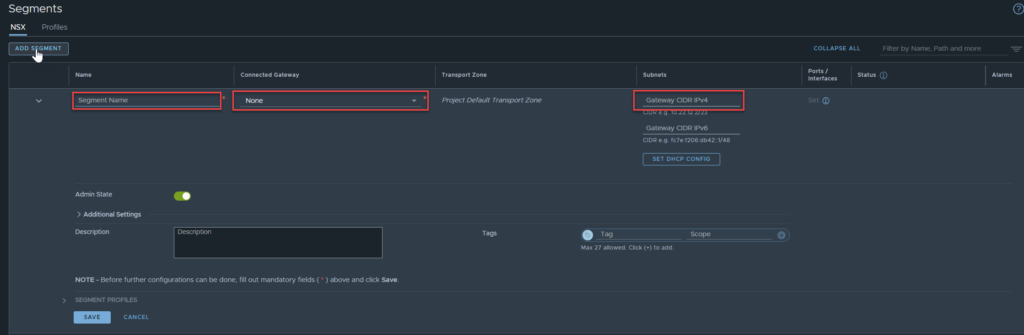
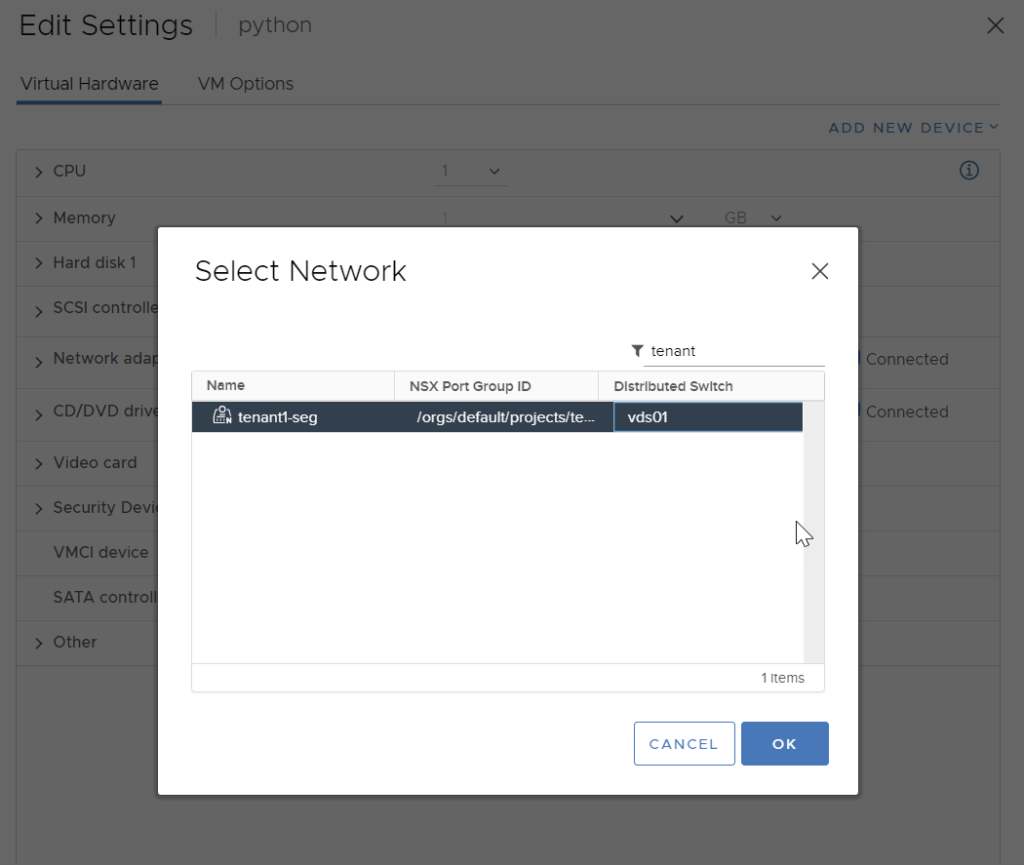
Navigate to Networking, Segments, Click on Add Segment. You will see the below screen.
The object within the tenancy looks as it would normally.
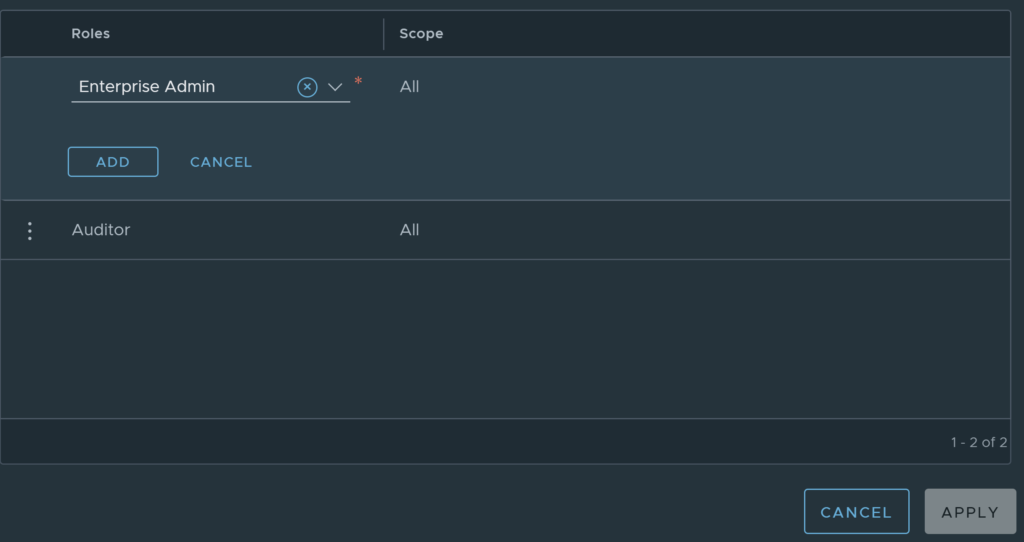
Add the role you want for the user, I am using enterprise admin, but you should really select a role such as Project Admin, or another role with lower permissions.
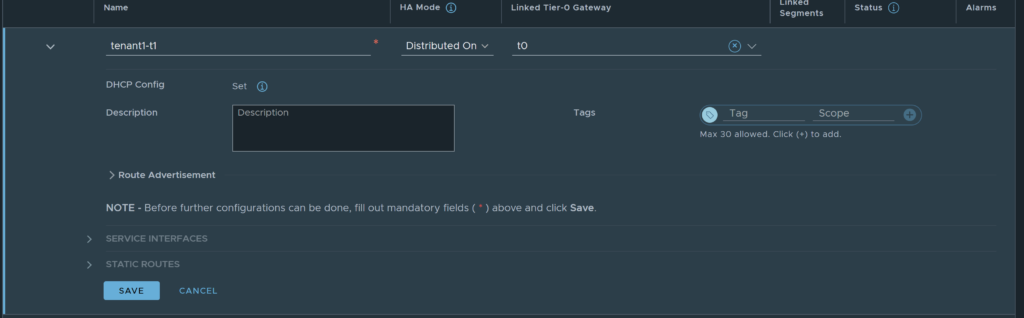
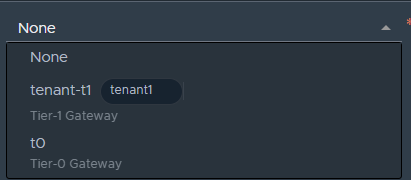
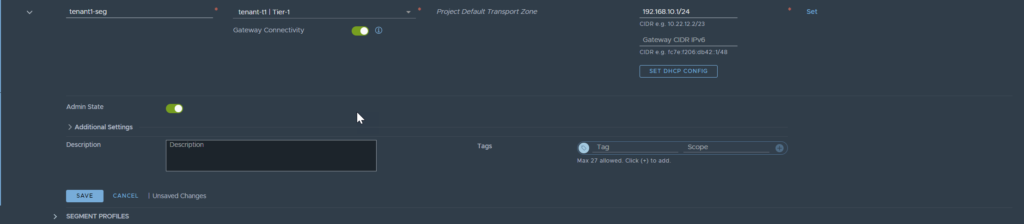
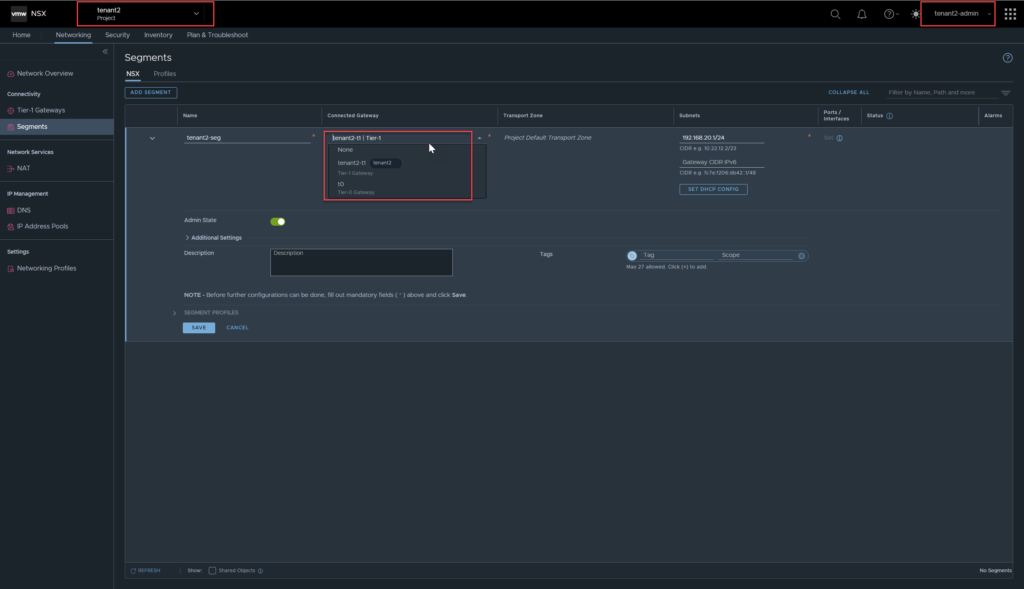
The name is required, if you select none for the connected gateway, then you will not be required to add a subnet. The moment you select a linked gateway, the subnet field becomes mandatory. The choices of the gateway are the Tier-0 gateway that was linked to the tenant and the Tier-1 gateway that was created earlier.
In this example, I will not be using any stateful services, so I have selected the Distributed Only HA Mode, if stateful services are required; select either Active-Standby or Active-Active. If north-south connectivity is required, ensure you select a Tier-0 gateway. Click Save once done.
Configuring Quotas
Administrators would have to consider outages, downtime, and order of operations for moving from the default space to a project. In saying all of that, I think it is a step in the right direction and look forward to seeing how it develops in the future.
Configuring multi-tenancy not overly difficult, at a high level the steps are listed below;
| Networking | Security | Inventory |
| Tier-1 Gateway | Distributed Firewall Security Policy | Service |
| Segment | Distributed Firewall Rules | Service Entry |
| Segment Port | Gateway Firewall Policy | Group |
| NAT Rule | Gateway Firewall Rules | Context Profile |
| DNS Service | L7 Access Profile | |
| DNS Zone | ||
| IP Address Pool | ||
| IP Address Pool Subnet | ||
| IP Address Block | ||
| IP Address Allocation | ||
| ND Profile | ||
| DAD Profile | ||
| Gateway QoS Profile | ||
| DHCP Relay | ||
| DHCP Server |
The default org is where infrastructural fabric objects such as Tier-0 gateways, VRFs, Edges, Edge clusters, Transport Zones, hosts, etc reside. Within the default view, you will also be able to create users and their role mappings for each project. A tenant administrator, and subsequently a tenant will not have access to the system tab in VMware NSX Manager, as a result will not have access to create the objects mentioned earlier.
Configure Networking
If you have created projects in the earlier version and plan on upgrading, the projects will appear in NSX 4.1.
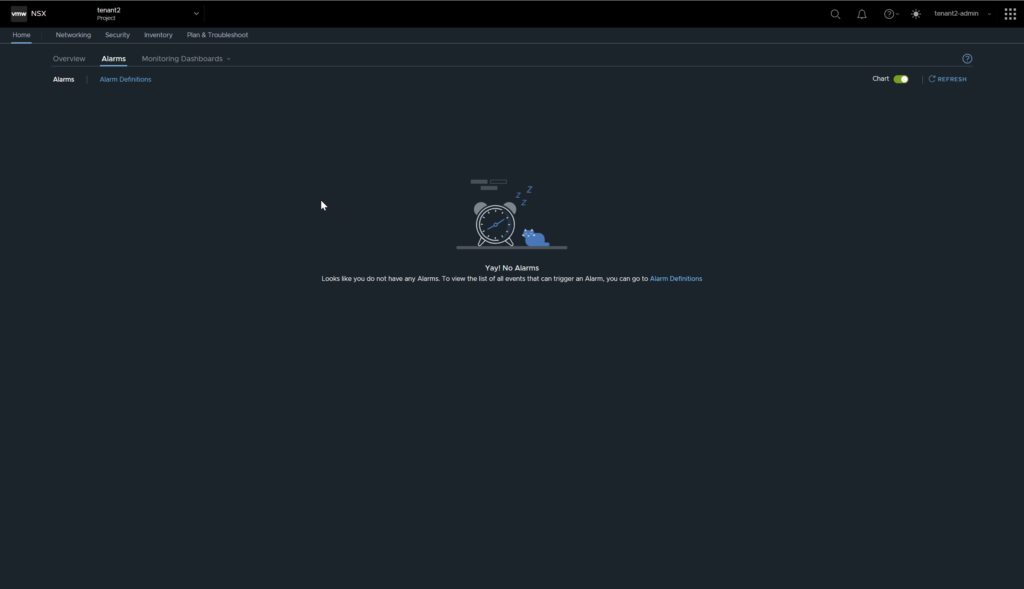
In theory, this should raise an alert/alarm for tenant 2, so I will now log in as tenant 2 and check the status. No alarms were triggered, let’s try creating another segment to see if it triggers an alarm.
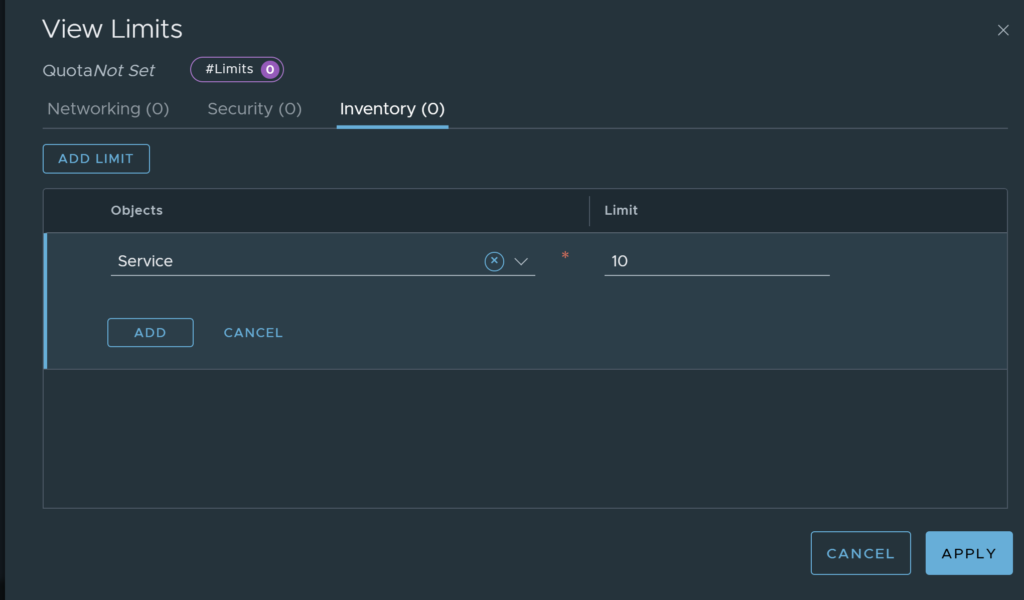
Quota’s allow you to create a limits for objects in each tenancy, this becomes increasingly important as the number of tenants scale out. The NSX platform has overarching limits for objects across every tenancy, these limits can be seen here. It is crucial that these limits are adhered to, exceeding these tested limits may lead to system instability, as I have seen in various customers.
Creating a Tier-1 Gateway
You will see a similar output as the below image.

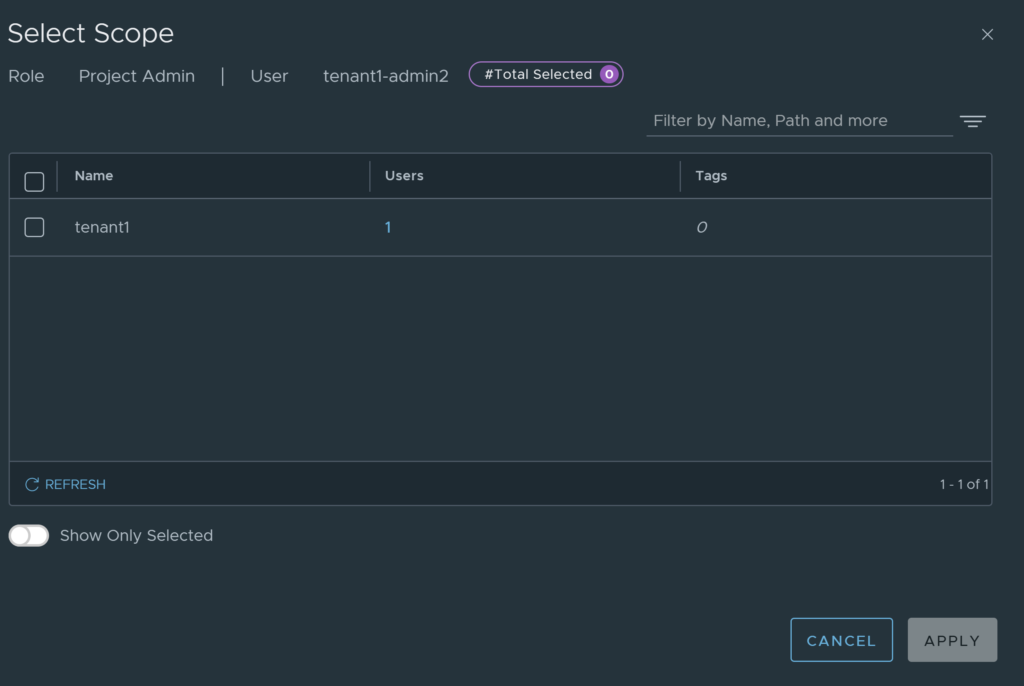
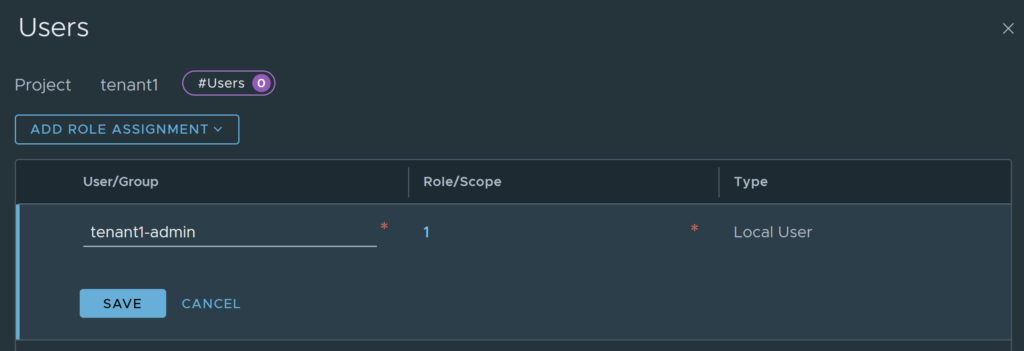
You will be able to see the User assignment screen in the image below. Click on add role assignment (project admin in this case), select the source (Local User, LDAP, VIDM User) I will be using Local User. Type in the name of the user created earlier, select the role/scope (project admin in this case), click save.
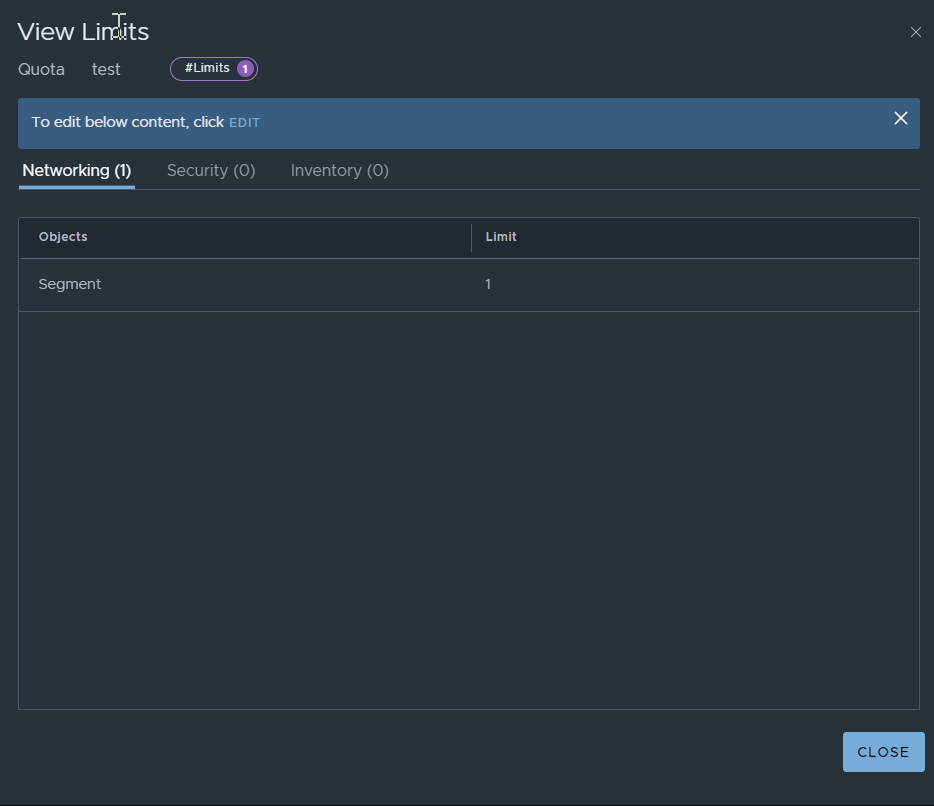
In order to test tenant specific alarms, I have created a quota for tenant 2 with a maximum limit of 1 segment.
Creating a Segment
Prior to VMware NSX 4.0.1.1, multi-tenancy could be achieved with some trickery. This was achieved with using principal identities, but it wasn’t clean or easy, and not very widely adopted.
As you can see, the table does not cover all objects that can be created or exist within VMware NSX, I assume as new versions release, this list will continue to expand. It’s relatively easy to create a quota, as can be seen in the image below, add the object and enter the limit, then click apply.
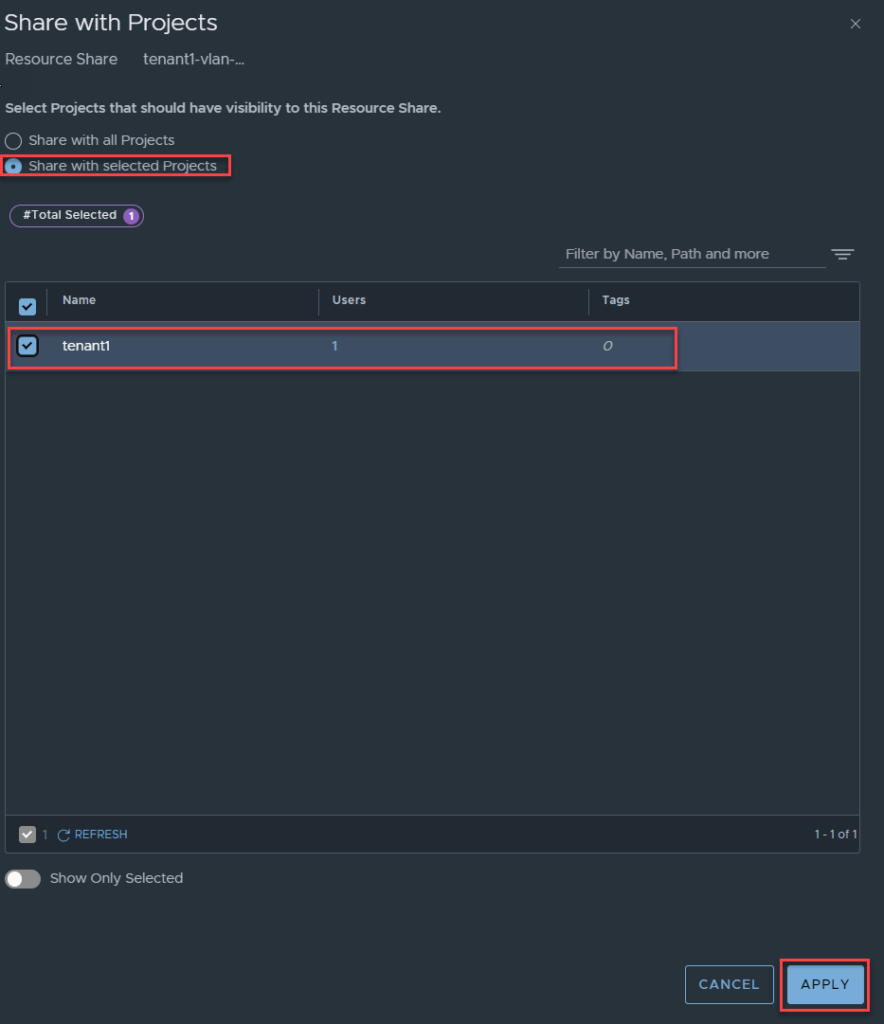
Next, click set under Shared With, select the project to share the resource with. Click Apply.
Creating and Defining Network and Policy Objects
This section will cover the logical topology and design of the VMware NSX multi-tenancy solution, it will not provide design examples for environments.
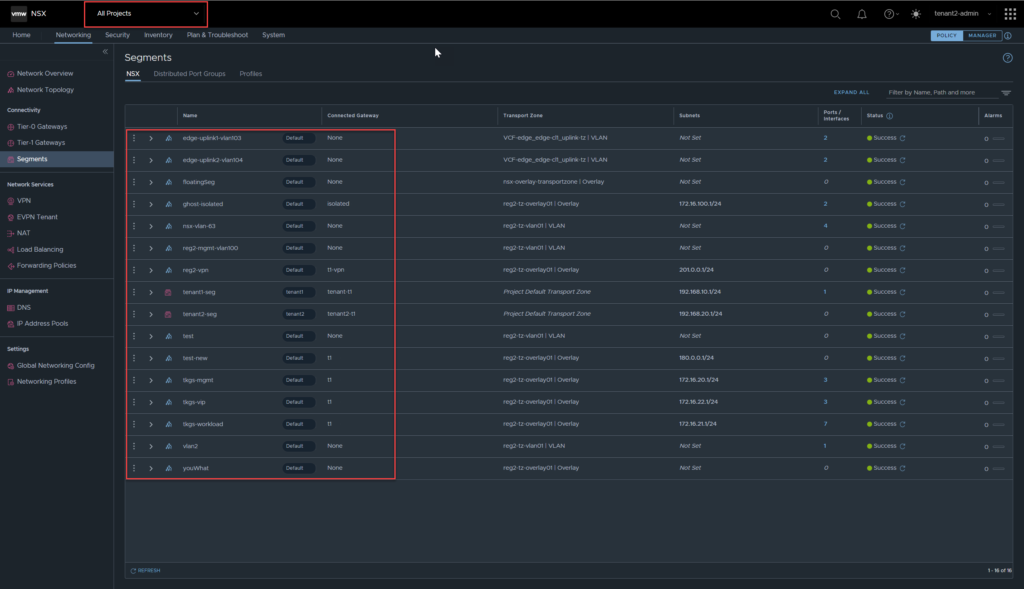
From a configuration perspective, it seems as though the tenants are isolated. Tenant2-admin can still click on all projects which is a read-only view of NSX and lists all objects underneath the default org. You will also notice, there are no configuration options, it is essentially read only.
VMware NSX 4.1 is required to configure multi-tenancy (projects) via the user interface, otherwise VMware NSX 4.0.1.1 will suffice when creating tenancies via the API.
Tier-1 gateways, static routing on Tier-1 gateways, Overlay Segments, Segment Profiles, NAT, DNS Forwarder, IPAM, DHCP, Gateway QoS, Distributed Firewall (DFW), and Gateway Firewall (GFW).
To verify, log out as administrator, then log back in as the tenant administrator, navigate to Networking, Segments. By default, you will not see shared resources, ensure you select the checkbox below ‘Show Shared Objects’.
You will see the VM appear within the tenancy under Virtual Machines now.

It looks like the quota limit alarm is raised under the default / all projects pane, as it was created in the default org, which makes sense.

The alarm definitions seem mostly infrastructural, so getting them to trigger will take some testing. Based off my looking around, it seems as though the alarms would not be tenant specific ie, edge down, TEP down etc, and would therefore appear in default, as well as tenancy alarms.
Tags and objects
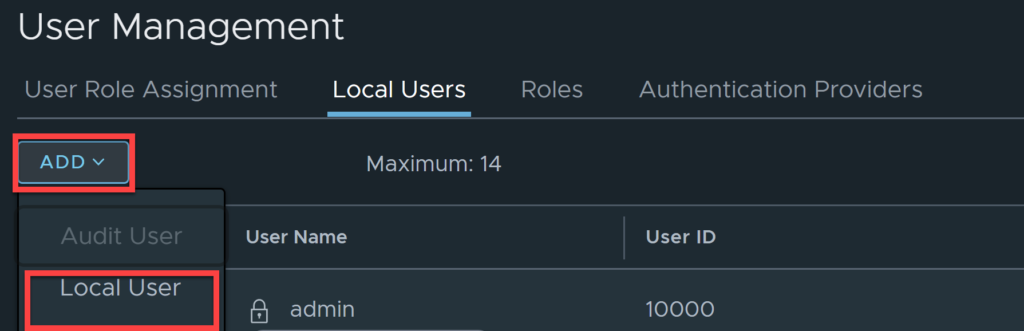
You will be presented with the below screen, click add, local user.
Checking the project quota now shows that it has been exceeded.

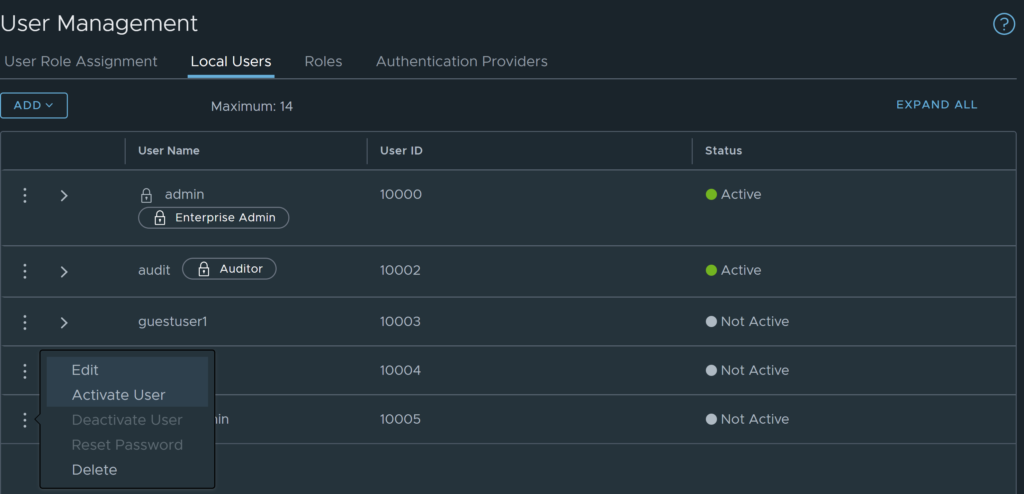
You will now need to activate the user, to do so, find the user in the local users list, click the three dots and select activate.

To ensure tenants are not able to ‘cross-communicate’ or see each others resources, I have created a second tenant, called tenant2, along with its own administrator account, effectively followed all the steps outlined above.
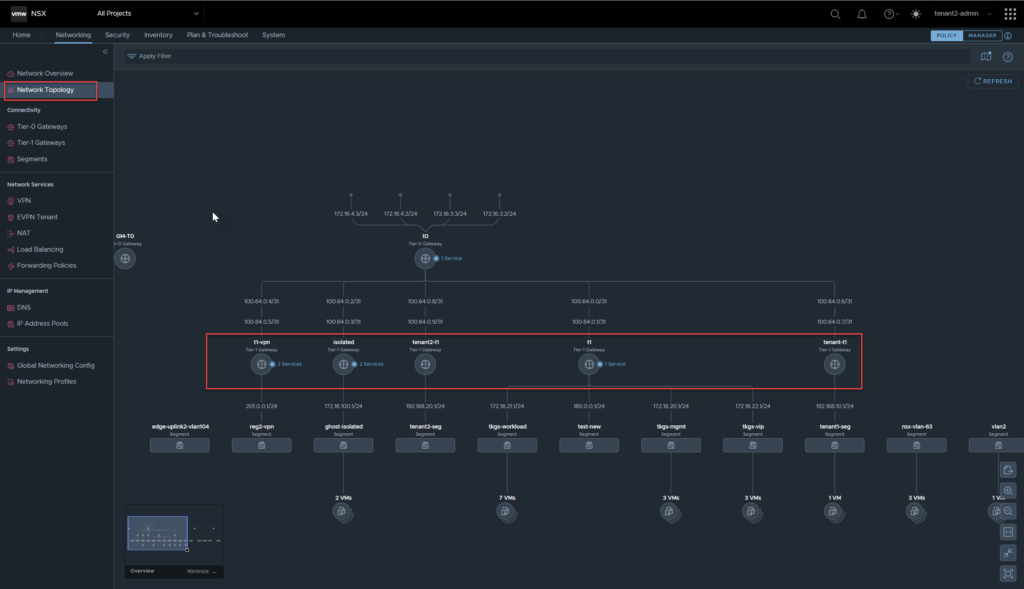
The tenant administrator also has visibility across the network topology view.
Sharing Resources into Tenancies
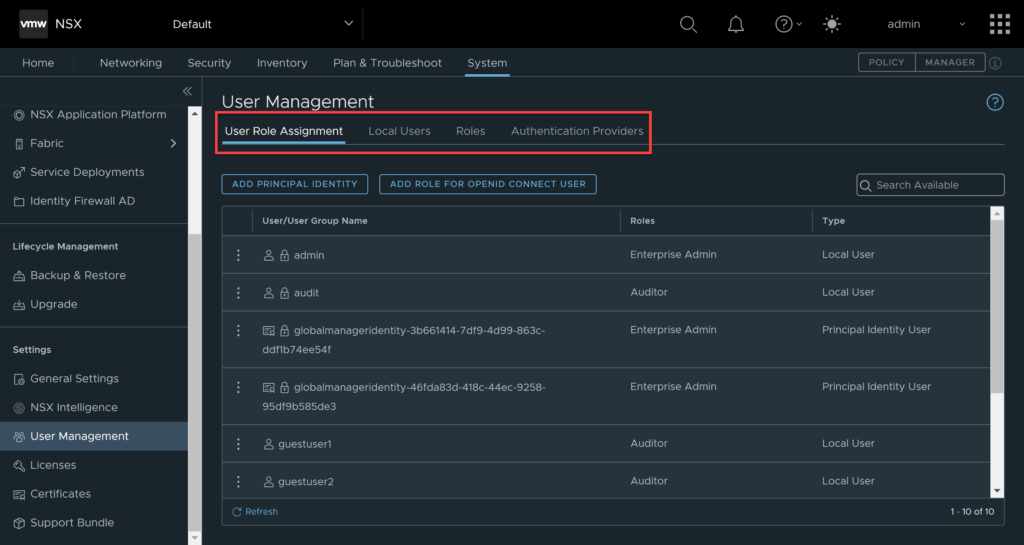
Log into NSX, navigate to System, User Management, we will be focussing on the areas highlighted in the image below. In this write up I will be using locally created users, not users synced via an identity provider. Click on Local Users.
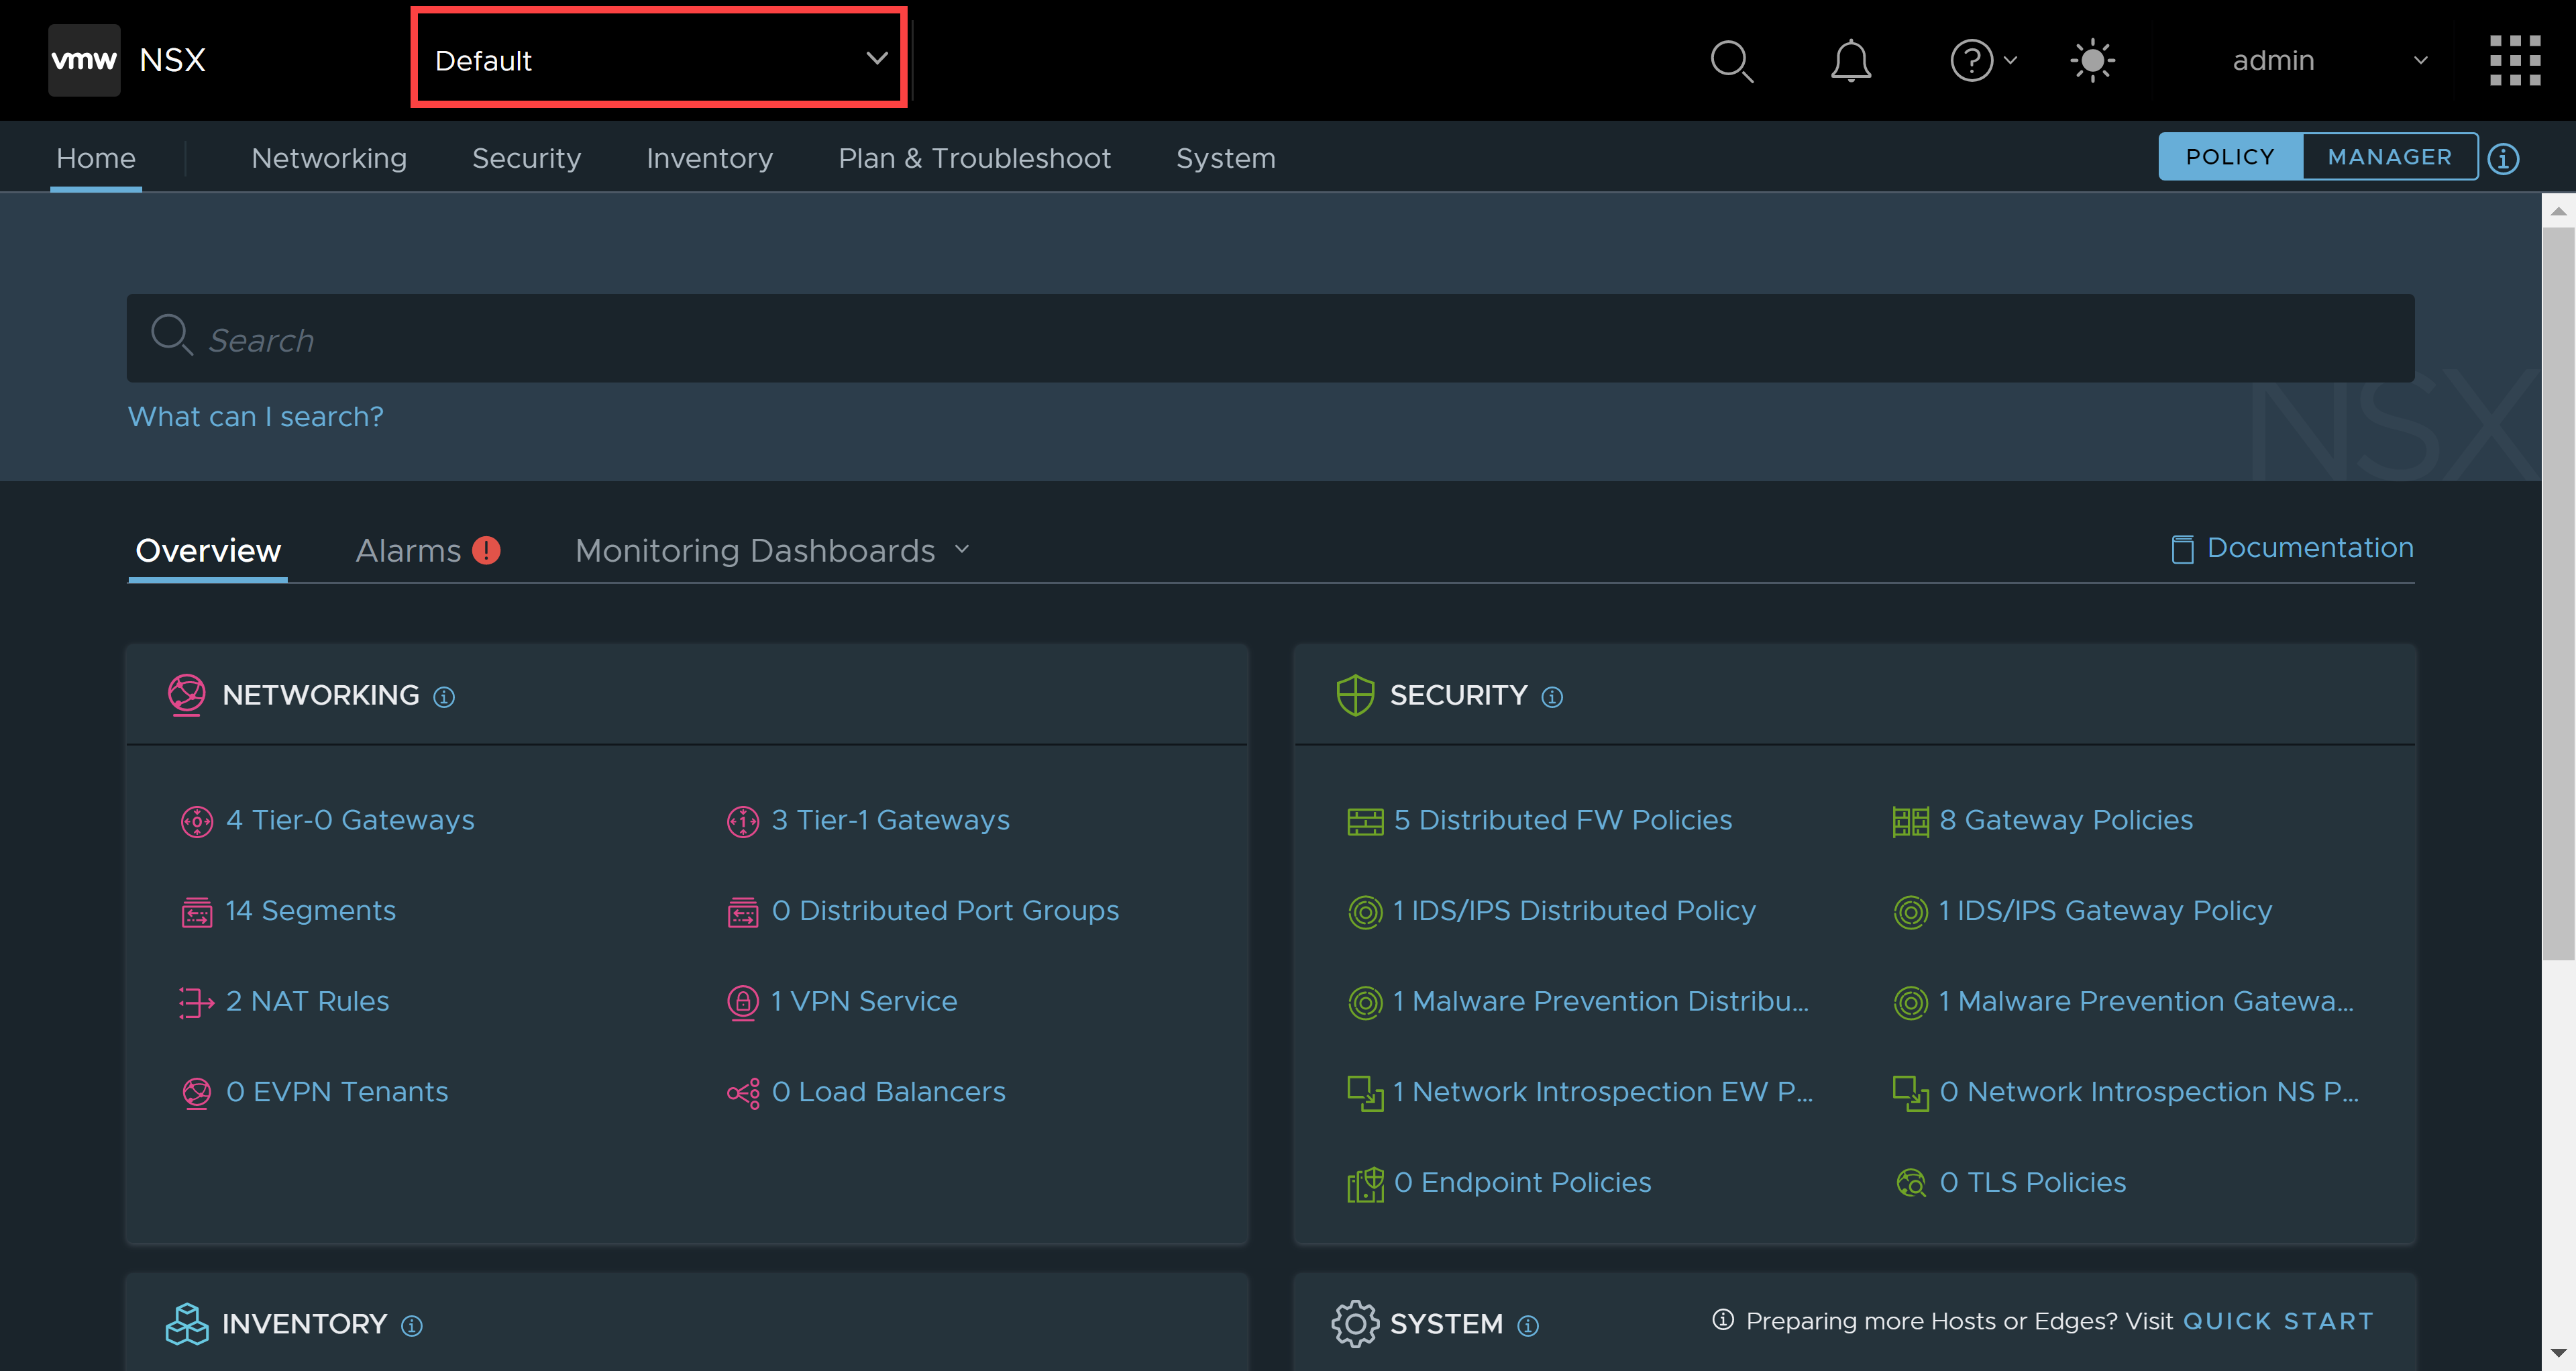
Log into VMware NSX, ensure it is version 4.1, if it is you should see the drop-down shown in the image below. Click on the little down arrow.

There are 3 ‘pillars’ that quotas can be created for, they are Networking, Security, and Inventory. The objects that quota’s can be configured for currently are in the table below.
This is not a strict order, some of the steps may be done at different times depending on your deployment. This section will cover the steps listed above excluding step 1, as I already have a Tier-0 gateway configured.
Click apply, once you are done. You can also remove any roles that you don’t want there.
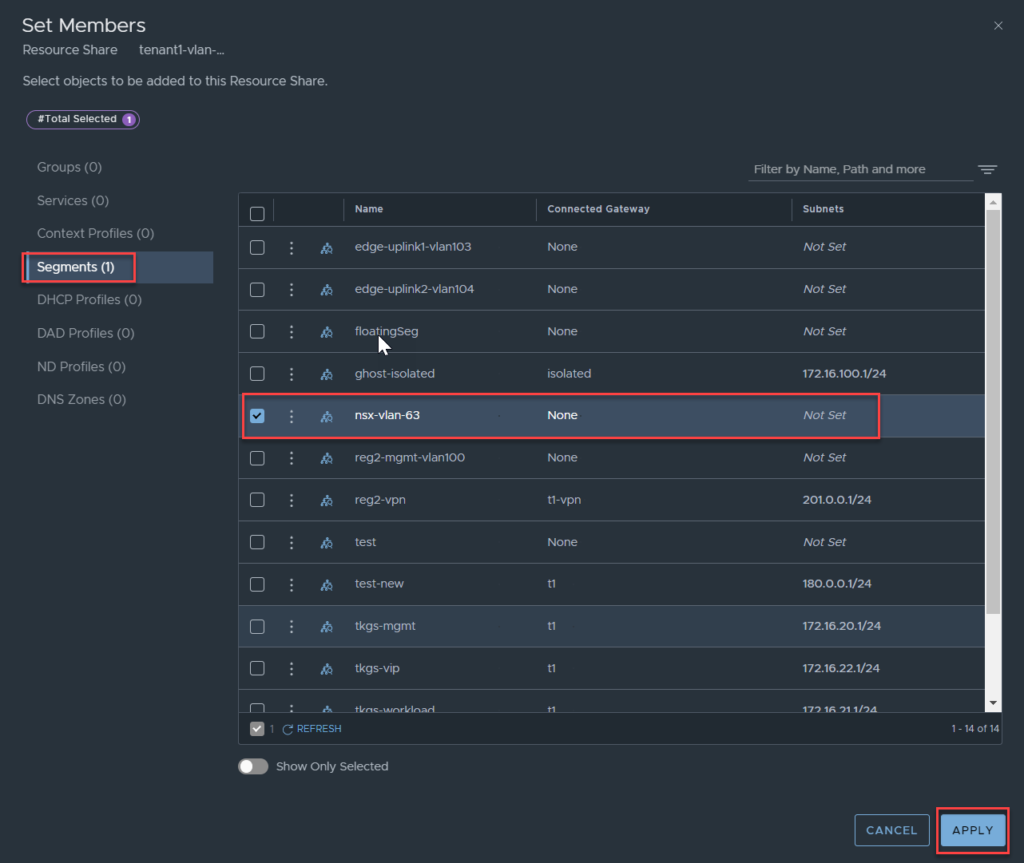
In the next section, click on segments, select the segment you want to share, in this case ‘nsx-vlan-63’, and click apply.
The good news is, it doesn’t allow you to exceed the quota, the bad news is, there is no alarm triggered from hitting the quota.

You will also notice that it logs into the default namespace, which is not where you want to create the tenant specific objects anyway. Click on the drop down and select the tenancy for this user. The moment you do that, your options are reduced.
Populate all the details as you normally would, notice, the Linked Tier-0 Gateway provides a choice of the gateways that were selected when the project was created. If other Tier-0 gateways are required for the tenant, you will need to log in as the administrator account or an account with the relevant permissions and assign the gateway to the tenant.
You will need to select the Project Scope (the project to apply the user to).

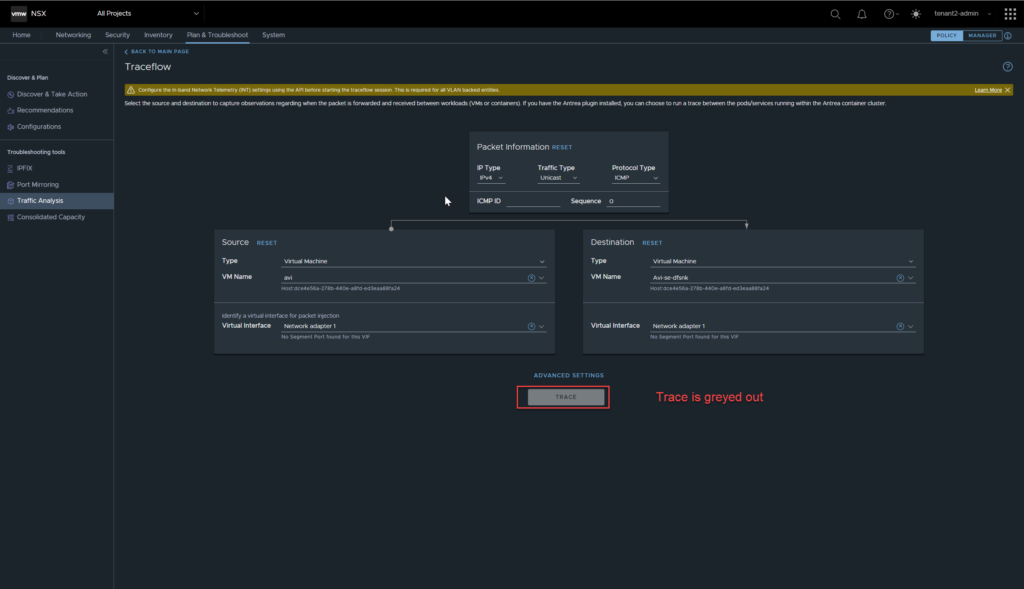
Whilst under all projects, the tenant administrator can also see all functions under Plan & Troubleshoot, however, cannot run tools such as Traffic Analysis under all projects, regardless of being able to list VMs etc.
I will be completing all the steps in this section using the local user created earlier, called tenant1-admin. Log back into NSX using the local user account, you should notice some options are greyed out, essentially everything outside of the tenant. Based off these results, it looks as though the Project Admin role allows the user to see other objects, but not modify or create.
Verify Tenant Isolation
The image below shows a VLAN backed segment in the default org called ‘nsx-vlan-63‘, which needs to be shared to tenant1.
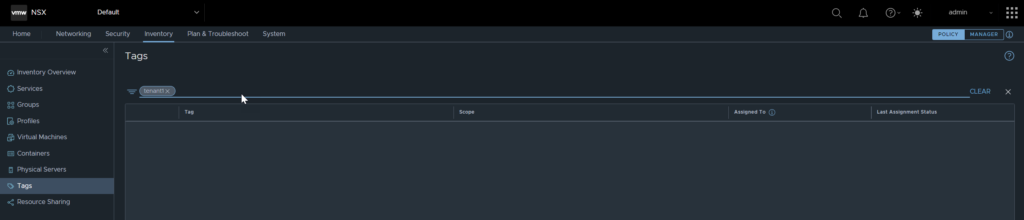
As you can see, the tag is not visible, it is safe to say objects defined within the tenancy are not visible ‘upstream’.
Now, I will navigate back to the default org and check to see if the tag is visible.
You will now be able to assign roles to the user. Click on add role.
As mentioned earlier, VLAN backed segments are not supported with tenancies, only overlay segments. What happens when a tenant requires access to a VLAN / VLAN segment for let’s say a service interface?
Tenant Alarms, Operations, Logging
Alarms
One thing to note, while creating the tenant2-t1, the tenant1 Tier-1 gateway was not visible.
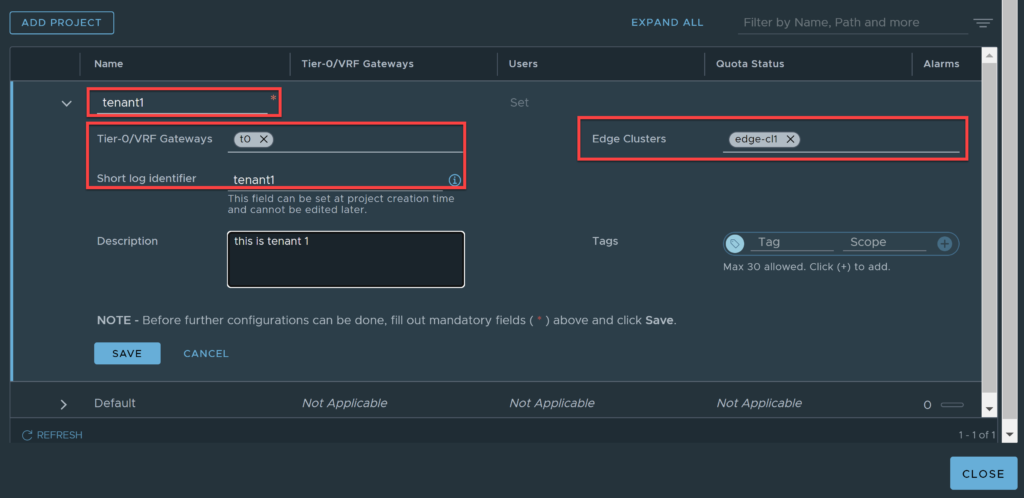
Populate the details relevant to the tenant you are creating. I will discuss the use and purpose of the Short Log Identifier later in this article. Click save once done.

You will be taken back to the projects screen and should be able to see the project listed. If you created project users earlier, you can assign the users by editing the project and clicking set under users.
Note: This will only work if you already have a project created. If you are following along, you will not have a project yet. You can also set the role under the user role assignment in the project user settings, you will see this in the next section.

Further details can be found on the VMware website.

It’s a good question, and if you look in the default org of NSX you will see all the VMs in vCenters inventory.
Logging
Earlier when creating the projects, there was a field called ‘Short log identifier‘. This is useful for log tracing and debugging.
As mentioned earlier in this article, the supported services/features for VMware NSX multi-tenancy are reduced. This section will focus on creating Tier-1’s, Segments, and how they look in the tenancy, and in the default scope, however, there is no difference in the process of creating these objects within a tenant.
There may be scenarios where administrators are required to share certain resources with tenancies, this can be achieved using Resource Sharing.
Summary
Similarly, any services, groups, profiles, and tags that were created in the default org will not be visible to the tenant. This can be remediated with resource sharing, which we will cover later in this article.
Multi-tenancy was first introduced in VMware NSX 4.0.1.1, however, was driven via API. This article will focus on multi-tenancy in VMware NSX 4.1 which now allows users to have logical tenancy separation in the UI as well as API. This is fundamentally different to manually segmenting each tenant using logical gateways. Administrators now have the ability to provide true multi-tenancy, this article will cover all aspects of VMware NSX multi-tenancy; what it is, what it looks like, how to configure it, how to verify the configuration, and how to monitor it.
Within the tenancy, navigate to Networking, then Tier-1 Gateways. Click on Add Tier-1 Gateway.
Each deployment of VMware NSX has a single default org, which cannot be changed or modified. Objects created in the default space can be shared with projects / tenants, which you will see in this article.

![Installation of Linux Mint 22 [Cinnamon Edition] Desktop](https://megazencarthosting.com/wp-content/uploads/2025/10/installation-of-linux-mint-22-cinnamon-edition-desktop.webp)