Most AI assistants on Linux can explain how to switch your Wi-Fi but can’t actually do it. openKylin 3.0 ships KylinBot and the Xiao K assistant, so we’ll test whether they really change network, Bluetooth, and display settings.
If you have used an AI chatbot for Linux work, you have probably had it tell you exactly which nmcli command to run, and then you still had to open a terminal and type it yourself.
The assistant understands the task, but it has no way to reach into the system and carry it out, so you end up doing the last and most important step by hand.
That gap is exactly what openKylin 3.0 is trying to close, which is an open-source Linux distribution developed in China, incubated and operated by the OpenAtom Open Source Foundation, and this release puts an AI agent inside the operating system itself.

It introduces KylinBot, an AI agent framework, and Xiao K, an AI assistant that can control system settings like Bluetooth, Wi-Fi, display brightness, and input devices via voice or text commands.

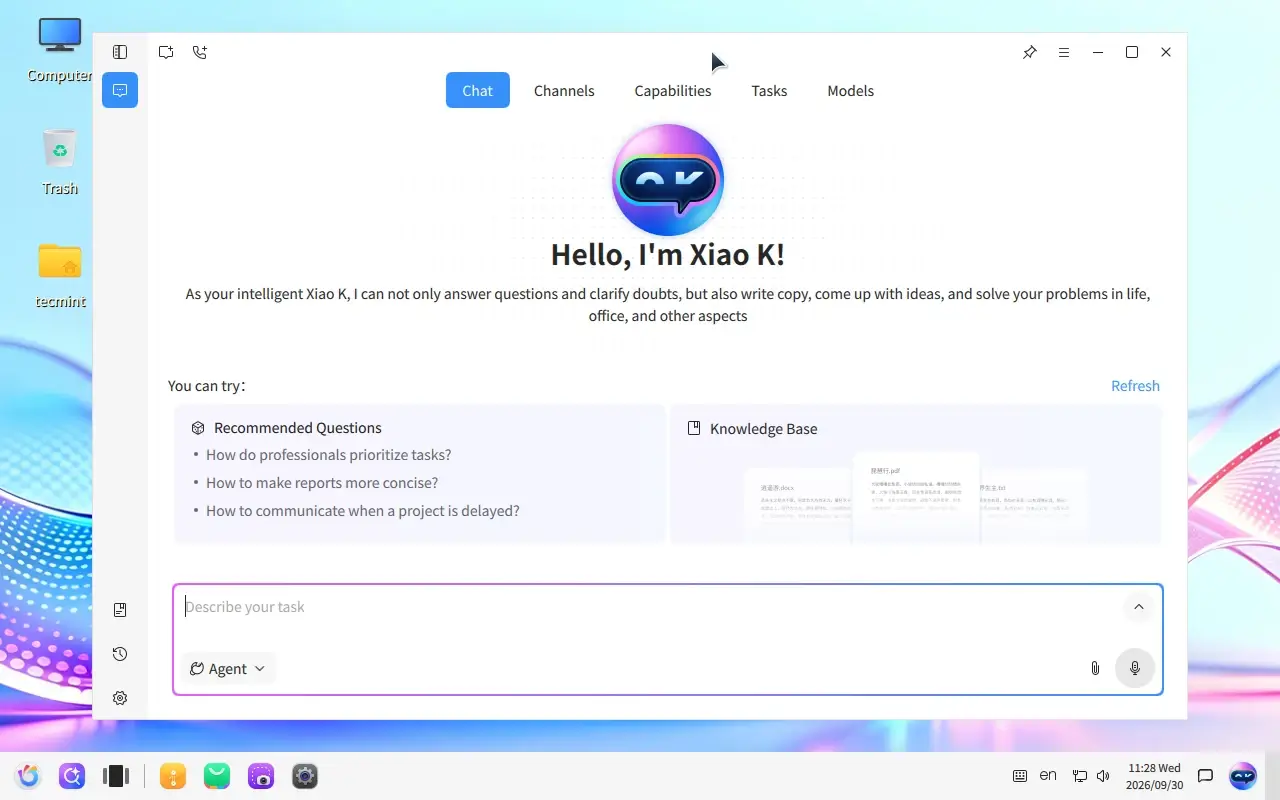
What makes this more than another chatbot is the way the agent talks to the desktop, means agents call desktop capabilities through the MCP protocol instead of simulating clicks, where MCP (Model Context Protocol) is an open standard that lets an AI model call tools in a structured and predictable way.
In this review, we will look at how that works, install the release, test the agent the way a sysadmin would test any new automation tool, and then decide whether it deserves the “smartest AI Linux desktop” label.
How openKylin 3.0’s AI Agent Works
Before installing anything, it’s worth understanding how the AI pieces connect to the system, because that explains both what the agent can do well and where you should be careful with it later in the review.
KylinBot is the agent framework that does the reasoning, and Xiao K is the graphical assistant you type or speak to. According to the project, KylinBot can understand requests through voice and text, keep context across multiple rounds of conversation, and use system capabilities to carry out tasks.
To reach those capabilities, it integrates Kylin-CUA, a computer-use automation tool that gives it access to system settings and device management.
The desktop side of the connection is handled by UKUI (Ultimate Kylin User Interface), openKylin’s own desktop environment. UKUI 4.24 standardizes the APIs across its modules and integrates KACP (Kylin Agent Control Protocol), so KylinBot can reach underlying desktop capabilities through unified APIs.
The layout below shows how a request travels from you down to the system.
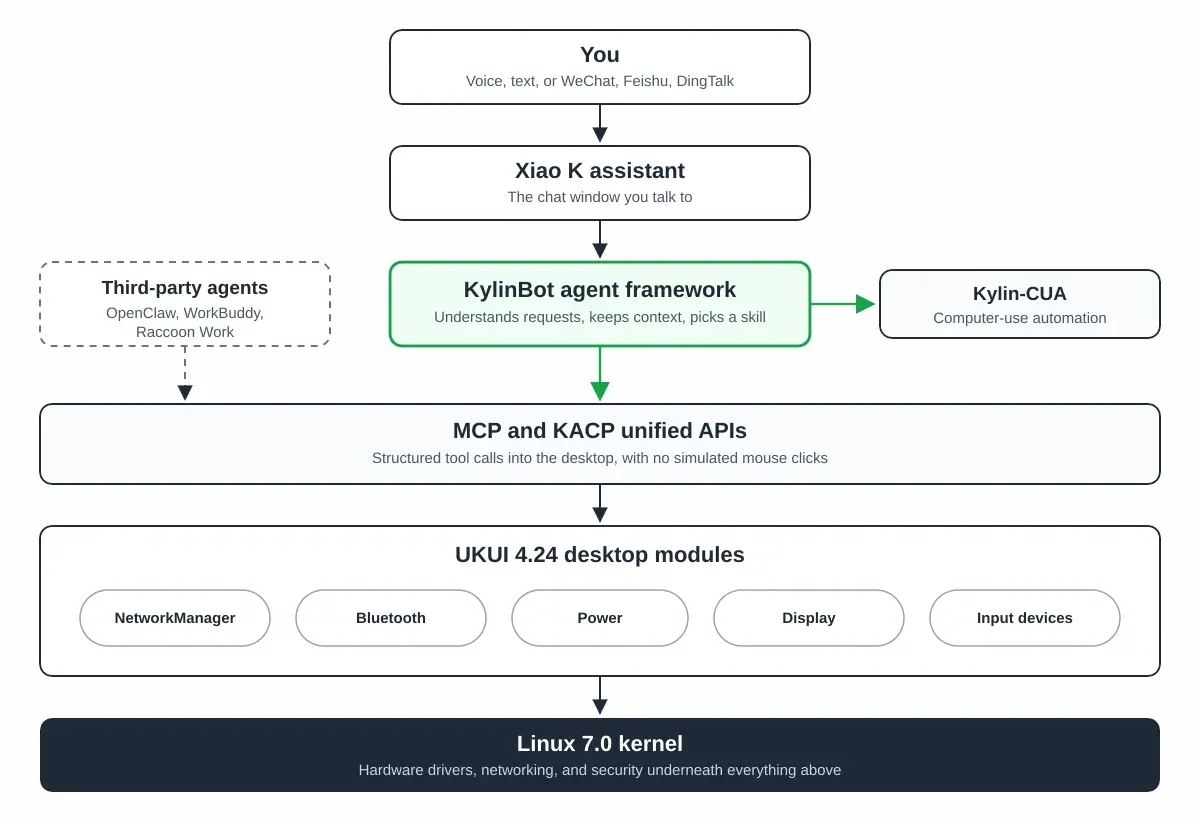
Because the agent works through these APIs, openKylin can let other agents plug into the same layer such as KylinBot, WorkBuddy, OpenClaw, and Raccoon Work can all run on openKylin 3.0, and the project says third-party agents get the same system access as its own.
Each specific task the agent can perform is packaged as a skill, which is a small, self-contained description of one job and the system interfaces it needs, and we will look at those skills directly in the hands-on section.
What’s New in openKylin 3.0 Beyond the AI Agent
The AI agent sits on top of a heavily updated base system, and those lower layers matter just as much if you plan to build software or run scripts on this release.
- openKylin 3.0 moves the kernel from Linux 6.6 straight to Linux 7.0, along with GCC 15, glibc 2.42, LLVM 22, and JDK 25, and more than 180 core components upgraded around the new kernel.
- The release integrates the three NIST post-quantum cryptography standards (ML-KEM, ML-DSA, and SLH-DSA) through the openHiTLS cryptography suite.
- With UKUI 4.24, you can make a fist to take a screenshot, wave your hand to turn pages or adjust volume, and use global voice input to issue commands, and Kylin uses the webcam to capture those hand gestures.
- kylin-time replaces the legacy
timeutility, kylin-wget replaces the classicwget, and kylin-ki18n replaceski18n, all rewritten in Rust to reduce memory-safety bugs such as buffer overflows.
We will check how these replacements are installed in Example 4, since a rewrite can behave slightly differently from the tool your scripts expect.
Install openKylin 3.0 or Upgrade From the Beta
Now that you know what the release contains, the next step is getting it onto a machine, and the first thing to plan for is the download size. The ISO is a little over 7 GB, mainly because the OS comes with pre-installed AI models, so you will need a USB stick of at least 8 GB and some patience on a slower connection.
For a first look, a virtual machine is the safest place to start, and we gave ours 4 CPU cores, 8 GB of RAM, and 60 GB of disk, since the bundled models and the agent run alongside the desktop.
Keep in mind that a virtual machine has no real Wi-Fi or Bluetooth radio, so the network and Bluetooth skills are best tested on a laptop, which is why Example 2 later runs on real hardware.
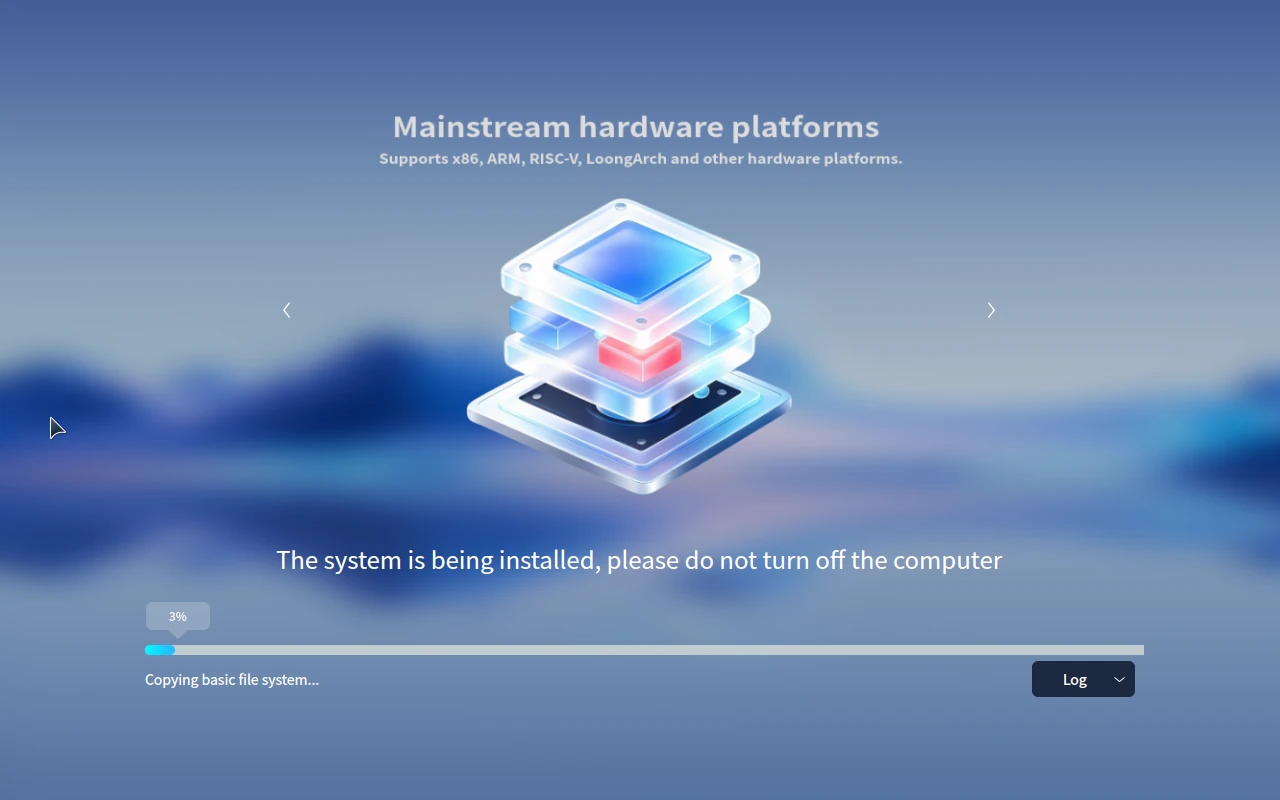
If you plan to install on bare metal, check your hardware first, because the project publishes hardware compatibility lists for x86, ARM, LoongArch, and RISC-V in its download page.
Verify and Write the ISO to a USB Drive
Once you have downloaded the x86_64 desktop ISO from the openKylin download center, it’s a good idea to confirm the file isn’t corrupted before writing it, since a damaged 7 GB download usually fails halfway through the installer with no clear error.
Generate its checksum with sha256sum and compare the long string in the output with the SHA256 value published on the download page.
sha256sum openKylin-3.0-*.iso
With the ISO verified, find your USB drive’s device name with lsblk and write the image with dd.
lsblk
sudo dd if=openKylin-3.0-*.iso of=/dev/sdX bs=4M status=progress oflag=sync
Replace /dev/sdX with your USB device, such as /dev/sdb. If you prefer a graphical tool, balenaEtcher or GNOME Disks do the same job.
During installation, we created the user tecmint and placed the VM on a host-only network at 192.168.56.20, which lets us run checks from the host later if needed.
Upgrade an Existing 3.0 Beta Installation
If you are already running the 3.0 Beta, you can skip the reinstall entirely, because openKylin uses the familiar APT and dpkg package tools and the project documents a standard APT upgrade for Beta users:
sudo apt update
sudo apt upgrade
The Update page in System Settings does the same thing if you prefer the graphical route.
Testing openKylin 3.0 From a Sysadmin’s Point of View
With the system installed, we can start testing, and the approach here is the same one you would use for any new automation tool, which is to give it a task and then confirm the result independently from the terminal.
The first example doesn’t involve the AI at all, since it’s worth confirming the base system before trusting anything built on top of it.
Example 1: Confirm the Linux 7.0 Kernel and Toolchain
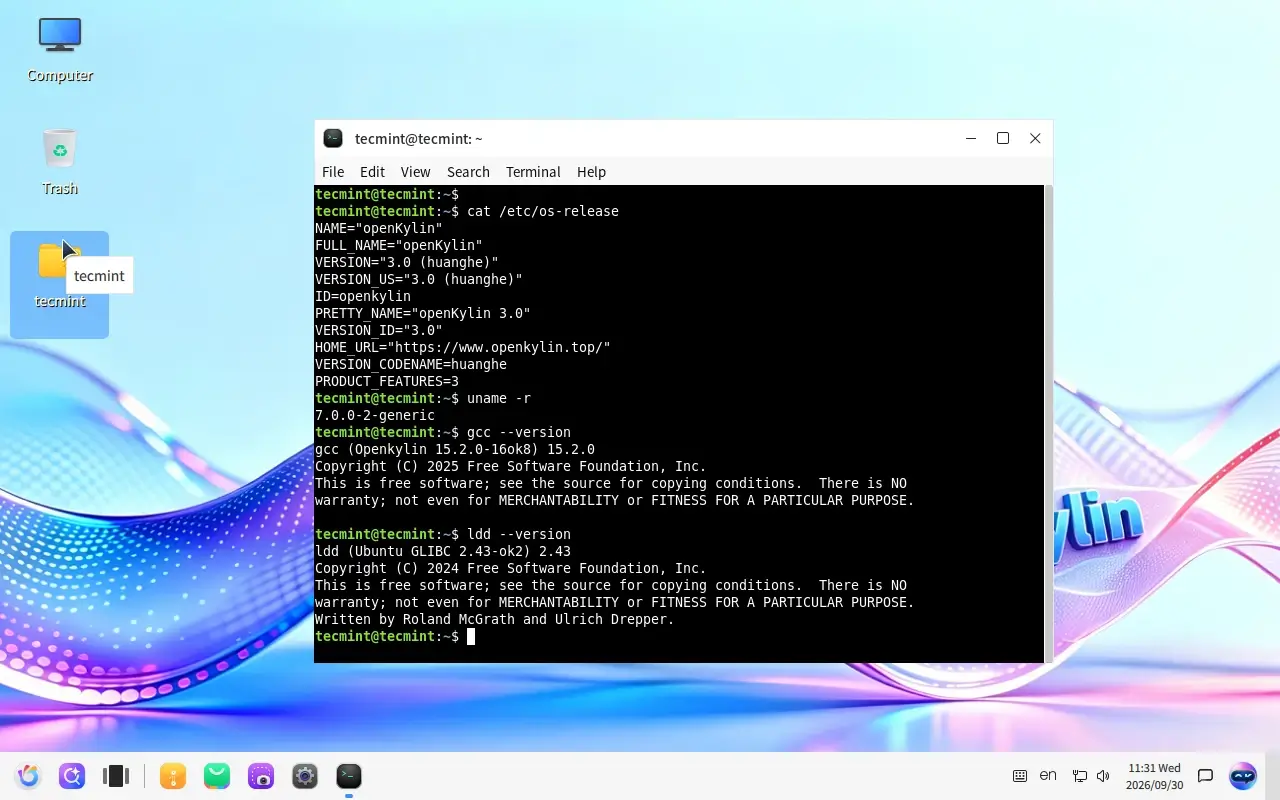
Open a terminal on the freshly installed system and check the release and kernel version:
cat /etc/os-release
uname -r
The os-release file should identify the system as openKylin 3.0, and the kernel string from uname -r should start with 7.0. The exact suffix after that varies with the build and any updates you have applied, so don’t worry if it doesn’t match another system exactly.
Since the new toolchain matters for anyone compiling software, check the compiler and C library next:
gcc --version
ldd --version
Look for GCC 15 on the first line of the gcc output and glibc 2.42 on the first line of the ldd output. This has one practical consequence worth remembering, which is that a binary you compile here and copy to an older distribution may refuse to start with an error like version 'GLIBC_2.42' not found, because programs linked against a newer glibc can’t run on systems with an older one.
Example 2: Let Xiao K Change Network and Bluetooth Settings
The first example confirmed the foundation, so now we can test the feature that sets openKylin apart. For this one, we moved to a laptop, because the skills involved need real radios. Among the built-in skills, there is deep integration with NetworkManager to manage Wi-Fi, Ethernet, and VPNs, plus Bluetooth toggling, device discovery, and automatic audio device pairing.
Before asking the assistant to do anything, record the current state of both radios, so you have something to compare against once the agent has finished:
nmcli radio wifi
bluetoothctl show | grep Powered
Now open Xiao K and type a plain request such as “Turn off Bluetooth and switch Wi-Fi off“. Once the assistant reports that it has finished, run the same two commands again.
If the agent did its job, nmcli radio wifi now prints disabled and bluetoothctl reports Powered: no. It’s worth doing this check every time you try a new skill, because an assistant saying it changed something and the system actually changing are two separate things, and the terminal is the reliable witness.
If you are testing in the VM instead, you can try the same idea with the wired connection by asking Xiao K to disconnect it and then running nmcli device status. Do this from the VM’s own console rather than over SSH from 192.168.56.1, since disconnecting the network will also cut your SSH session.
Example 3: Explore and Customize Skills From the openKylin-skills Repository
The agent in Example 2 relied on built-in skills, and since those skills are shared in a public Git repository, you can read how they work before letting the agent run them on your system.
Clone the repository from Gitee and look at its layout:
git clone https://gitee.com/openkylin/openkylin-skills.git
cd openkylin-skills
ls
Each skill describes what the agent is allowed to do and which system interfaces it calls, so this is the best place to learn the format before writing your own.
The project encourages this, since developers can build skills with a unified AI SDK and submit them to the openKylin-skills repository. One limitation to expect is that the repository is in Chinese, so you may need a translation tool to follow the skill descriptions for now.
To customize the agent for your own environment, a sensible first skill is something narrow and read-only, such as reporting disk usage with df -h or listing failed services with systemctl --failed.
Starting with read-only skills lets you learn how the agent interprets requests before you give it anything that can change the system, in the same way we verified its changes in Example 2.
Example 4: Check Which Tools Were Replaced by Rust Versions
The earlier examples focused on the AI features, but the Rust rewrites mentioned earlier can quietly affect scripts you bring over from other distributions. To see what wget actually points to on this system, follow any symlinks to the real binary and then ask dpkg which package owns it:
readlink -f "$(which wget)"
dpkg -S "$(readlink -f "$(which wget)")"
If the owning package is kylin-wget rather than the classic wget package, test your download scripts carefully, since a rewrite can differ in rarely used options and in the exact wording of error messages that some scripts parse.
Verdict: Is openKylin 3.0 the Smartest AI Linux Desktop Yet?
After testing the base system, the agent, and the skills, the answer depends on what you mean by “smartest“. For letting an AI agent change real system settings through proper desktop APIs, openKylin 3.0 is the most complete option available on Linux right now, and the fact that third-party agents get the same access makes it more open than a single-vendor assistant.
The weaker points are practical ones. The skill ecosystem is mostly documented in Chinese, the 7 GB ISO is heavy, and the Token Center login raises fair questions about where your prompts go.
For privacy-focused users or production servers, a mainstream distribution with a local model that you control is still the safer choice, while openKylin 3.0 is well worth a weekend on a spare laptop if you want to see where desktop AI is heading.
We’d love to hear how you would use an AI agent that can change your system settings. Would you give it access to network and Bluetooth controls on a work laptop, or keep it limited to read-only skills?
Have you tried writing a custom skill for KylinBot yet? And if you installed openKylin 3.0 on real hardware, feel free to share your machine model and any errors you ran into in the comments, so other readers can learn from them.