FrankenPHP is a modern application server for PHP that enhances the performance and capabilities of PHP applications. It is built on top of another server called Caddy web server, which helps developers to run PHP applications efficiently without the need for traditional web servers like Apache or Nginx.
FrankenPHP can make your PHP applications run faster by keeping your application in memory after the first load, so it doesn’t have to start from scratch with every request, which can lead to significant speed improvements.
With FrankenPHP, you don’t need to set up separate processes like PHP-FPM (FastCGI Process Manager) and a web server like Nginx or Apache. Everything runs in one place, making it easier to manage.
This guide walks you through the process of installing FrankenPHP on Ubuntu 24.04 in simple steps.
Step 1: Install PHP in Ubuntu 24.04
First, start by updating your system packages to ensure you have the latest software.
sudo apt update
sudo apt upgrade -y
Next, you need to install some essential packages, including PHP and other required libraries.
sudo apt install zip unzip curl -y
Once the required dependencies are installed, you can install PHP 8.4 from Ondrej’s PPA, which provides the latest versions of PHP.
sudo add-apt-repository ppa:ondrej/php -y
sudo apt update
sudo apt install php8.4 php8.4-cli php8.4-fpm php8.4-{bz2,curl,mbstring,intl,xml} -y
php -v
Step 2: Install FrankenPHP in Ubuntu 24.04
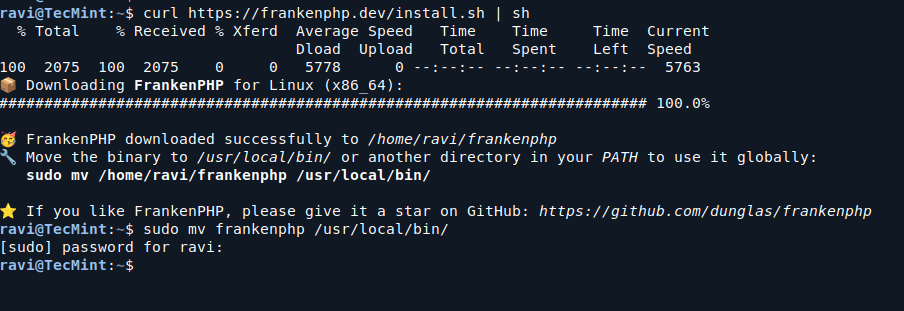
Now that PHP is installed, you can proceed with installing FrankenPHP using the following curl command.
curl https://frankenphp.dev/install.sh | sh
sudo mv frankenphp /usr/local/bin/

Step 3: Running Your PHP Application
To serve your PHP application using FrankenPHP, create a directory and a simple php script for your web application.
mkdir -p ~/my-app && cd ~/my-app
echo '<?php echo "Hello, FrankenPHP!"; ?>' > index.php
To serve the content of the current directory, run:
sudo frankenphp php-server
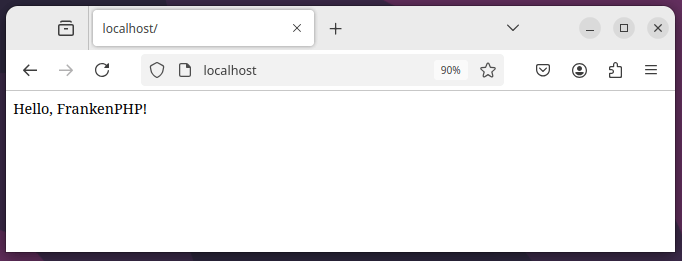
Open your browser and navigate to the following address to see the message “Hello, FrankenPHP!“.
http://localhost/
Or
http://ip-address/

Step 4: Setting Up Nginx as a Reverse Proxy
Using a reverse proxy like Nginx improves request handling, adds an additional security layer, and simplifies SSL/TLS configuration.
sudo apt install -y nginx
Create a new configuration file.
sudo nano /etc/nginx/sites-available/frankenphp
Add the following configuration:
server {
    listen 80;
    server_name yourdomain.com www.yourdomain.com;

    location / {
        proxy_pass http://127.0.0.1:8080;
        proxy_set_header Host $host;
        proxy_set_header X-Real-IP $remote_addr;
        proxy_set_header X-Forwarded-For $proxy_add_x_forwarded_for;
        proxy_set_header X-Forwarded-Proto $scheme;
    }
}
Replace yourdomain.com with your actual domain name.
Next, enable the configuration and reload nginx.
sudo ln -s /etc/nginx/sites-available/frankenphp /etc/nginx/sites-enabled/
sudo nginx -t
sudo systemctl reload nginx
- How to build a website with WordPress and what are the best plugins to use: Building a website with WordPress is an excellent choice due to its versatility, ease of use, and a vast array of plugins that enhance functionality. Here’s a comprehensive guide to building a WordPress website, along with recommendations for the best plugins.
- What does this property buzzword mean and how does it actually work? Gearing simply means borrowing money to buy an asset. Negative gearing can be a tax strategy used by investors and describes when the income (ie, the rent) made from an investment is less than the expenses it incurs, meaning it’s making a loss.
- How to Sell Your Ecommerce Business for the Best Value: Selling an ecommerce business can be a very profitable move. You can use the proceeds to invest in other projects, launch new ecommerce business websites, or even retire. For some startups, selling the business is the end goal. Whether you have a dropshipping website, sell with Amazon FBA, or own a large-scale ecommerce business, there’s an opportunity for you to sell.
- Comprehensive Guide to WordPress Website Development: Developing a WordPress website is a sequential process that requires careful planning, thoughtful execution, and consistent maintenance to ensure it meets the needs of users and achieves its intended goals. This involves a series of clearly defined stages, including planning, designing, content creation, optimisation, and ongoing maintenance.
- Top 10 High-Paying Jobs AI Won’t Replace in 2025: Artificial Intelligence (AI) is revolutionizing industries, automating repetitive tasks, and reshaping the global workforce. Despite its remarkable advancements, certain professions remain beyond AI’s capabilities due to their reliance on uniquely human traits like creativity, empathy, and critical thinking. This case study explores the 10 highest-paying, fastest-growing jobs in 2025 that AI won’t replace, delving into why these roles are indispensable and how they are evolving in an AI-driven world.
- Spill Your Guts: What To Wear To Olivia Rodrigo’s Australian Tour: Never afraid of screaming out all the dark, embarrassing things we’ve all thought before, Rodrigo sings about comparing herself to her boyfriend’s ex-girlfriend. If you want an edgy outfit that mimics the music…
- Top Social Media Plugins for WordPress to Increase Your Sites Reach and Engagement: If you are seeking to enhance your website’s reach and engagement on social media, you have come to the right place. In this article, we will delve into the premier social media plugins tailored for WordPress users. From Social Warfare to Jetpack, these plugins can facilitate seamless sharing of your content across diverse social platforms.Furthermore, we will provide recommendations to optimize your website’s visibility on social media. Keep an eye out for valuable insights!
- How to Change PuTTY’s Appearance: PuTTY is a widely-used SSH and telnet client for Windows and Linux hosting. While its default appearance is functional, you can customise it to improve aesthetics and usability. Below are the steps to modify PuTTY’s appearance, including changing the font, window size, colours, and cursor options.
- What programming languages does vBulletin use?: vBulletin was orginally written in perl and used a flat file database system. However, as sites grew they notice that sites could not cope with a large amounts of traffic. This problem has now been fully rectified when vBulletin was converted to php and a mysql database system.
Step 5: Configure SSL/TLS for Secure Connections
To ensure FrankenPHP performs efficiently and securely in a production environment, you need to install Certbot, which is a popular tool for obtaining and renewing free SSL certificates from Let’s Encrypt.
sudo apt install -y certbot
sudo apt install -y python3-certbot-nginx
sudo certbot --nginx -d yourdomain.com -d www.yourdomain.com
sudo certbot renew --dry-run
Conclusion
FrankenPHP is now installed and running on your Ubuntu 24.04 system. By following these steps, you’ve set up a high-performance PHP runtime suitable for modern web applications.
For advanced configurations, refer to the FrankenPHP documentation.


