By default, SSH already uses secure data communication between remote machines, but if you want to add an extra security layer to your SSH connections, you can add a Google Authenticator (two-factor authentication) module that allows you to enter a random one-time password (TOTP) verification code while connecting to SSH servers. You’ll have to enter the verification code from your smartphone or PC when you connect.
The Google Authenticator is an open-source module that includes implementations of one-time passcodes (TOTP) verification tokens developed by Google.
It supports several mobile platforms, as well as PAM (Pluggable Authentication Module). These one-time passcodes are generated using open standards created by the OATH Initiative for Open Authentication).
In this article, I will show you how to set up and configure SSH for two-factor authentication under RedHat-based and Debian-based Linux distributions such as Fedora, CentOS Stream, Rocky Linux, and AlmaLinux, Ubuntu, Debian, and Mint.
Installing Google Authenticator in Linux
Open the machine that you want to set up two-factor authentication, and install the following PAM libraries along with the development libraries that are needed for the PAM module to work correctly with the Google Authenticator module.
On RedHat-based Systems (RHEL, CentOS Stream, Rocky Linux, AlmaLinux), you need to enable the EPEL repository and install the required packages:
sudo dnf install epel-release -y
sudo dnf install google-authenticator qrencode-libs -y
On Debian-based systems, install the Google Authenticator PAM module using the following apt command.
sudo apt install libpam-google-authenticator -y
Generate Google Authentication Tokens
Once installed, run the following command as the user you want to secure.
google-authenticator
It will prompt you with a series of questions. Simply type "y" (yes) as the answer in most situations. If something goes wrong, you can run the command again to reset the settings.
After these questions, you will get your secret key and emergency codes. Write down these details somewhere, as we’ll need the secret key later to set up the Google Authenticator app.
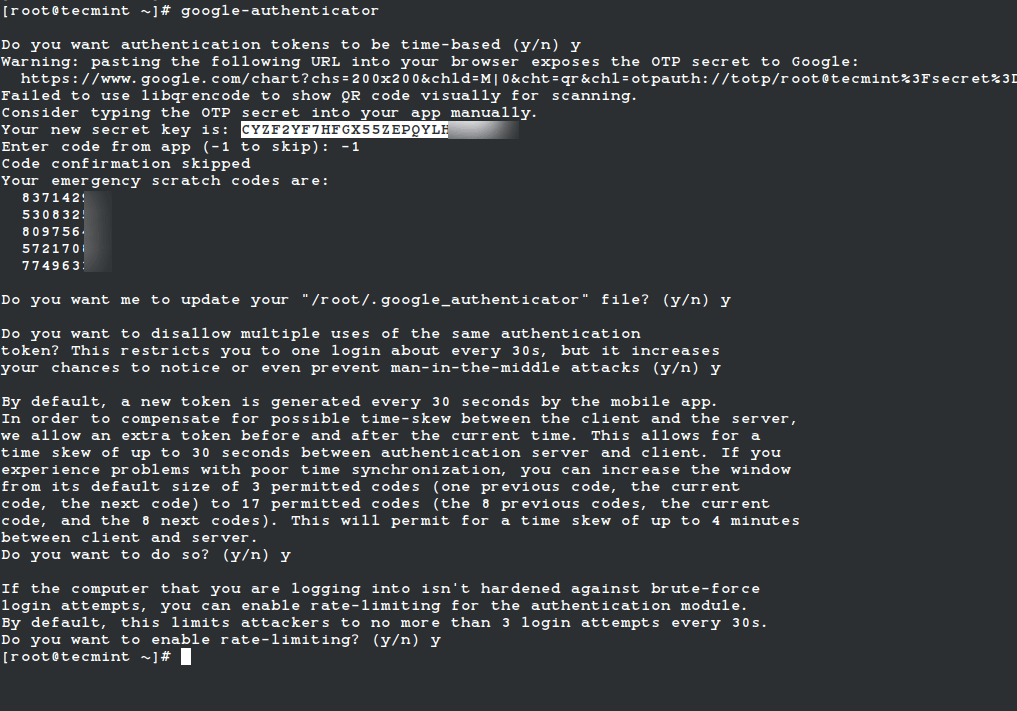
You may see output like this:
Do you want authentication tokens to be time-based (y/n) y
Warning: pasting the following URL into your browser exposes the OTP secret to Google:
https://www.google.com/chart?chs=200x200&chld=M|0&cht=qr&chl=otpauth://totp/root@tecmint%3Fsecret%3DCYZF2YF7HFGX55ZEPQYLHOO5JM%26issuer%3Dtecmint

Failed to use libqrencode to show QR code visually for scanning.
Consider typing the OTP secret into your app manually.

Your new secret key is: CYZF2YF7HFGX55ZEPQYLHOM
Enter code from app (-1 to skip): -1
Code confirmation skipped

Your emergency scratch codes are:
83714291
53083200
80975623
57217008
77496339
Continue answering "y" to all configuration prompts:
Do you want me to update your "/root/.google_authenticator" file (y/n) y
Do you want to disallow multiple uses of the same authentication token? (y/n) y
Do you want to increase the window to about 4min? (y/n) y
Do you want to enable rate-limiting? (y/n) y
Configuring SSH to Use Google Authenticator in Linux
Open the PAM configuration file ‘/etc/pam.d/sshd‘ and add the following line at the top or before any pam_permit.so line:
auth required pam_google_authenticator.so nullok
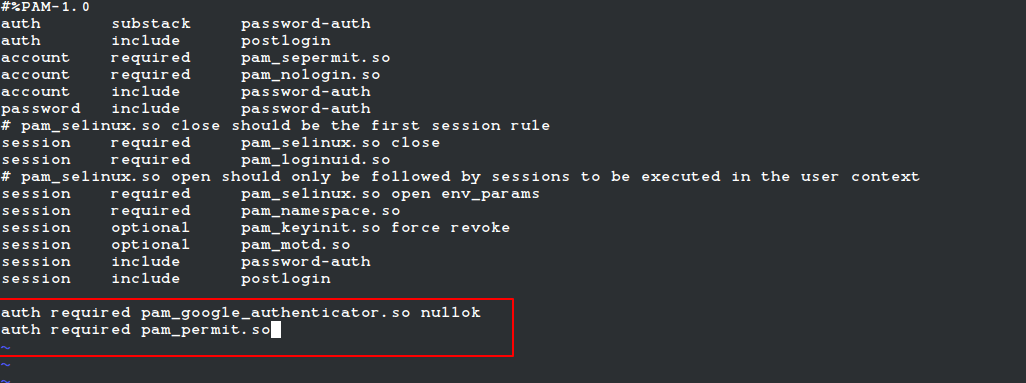
Note: If SELinux is enabled, move the .google_authenticator file to a location with proper SELinux context (like ~/.ssh/) and specify the full path:
auth required pam_google_authenticator.so secret=/home//.ssh/.google_authenticator nullok
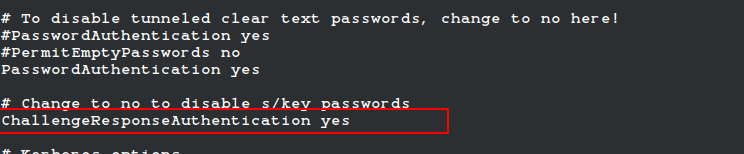
Next, open the SSH configuration file ‘/etc/ssh/sshd_config‘ and make sure these lines are set:
UsePAM yes
ChallengeResponseAuthentication yes
You may optionally enforce both 2FA and key/password authentication:
AuthenticationMethods publickey,keyboard-interactive
Finally, restart the SSH service to take new changes.
sudo systemctl restart sshd
Configuring the Google Authenticator App
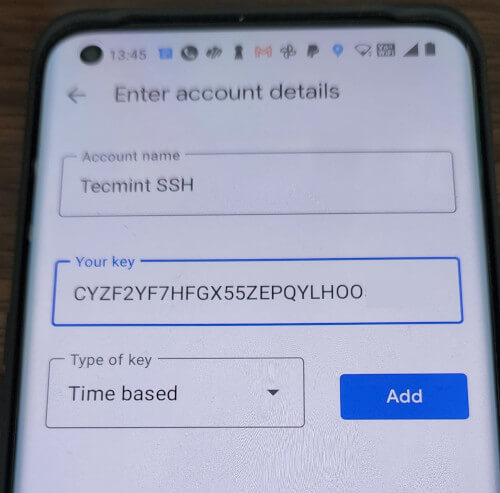
Launch the Google Authenticator app on your smartphone. Press + and choose “Enter a setup key“. If you don’t have this app, you can download and install the Google Authenticator app on your Android/iPhone/Blackberry devices.
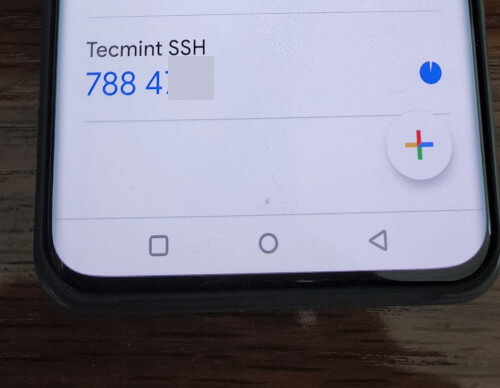
Add your account ‘Name‘ and enter the ‘secret key‘ generated earlier.
It will generate a one-time password (verification code) that will constantly change every 30 seconds on your phone.
Now, try to log in via SSH, you will be prompted with a Google Authenticator code (Verification code) and Password whenever you attempt to log in via SSH. You have only 30 seconds to enter this verification code; if you miss it will regenerate a new verification code.
login as: tecmint
Access denied
Using keyboard-interactive authentication.
Verification code:
Using keyboard-interactive authentication.
Password:
Last login: Tue Apr 23 13:58:29 2022 from 172.16.25.125
[root@tecmint ~]#
If you don’t have a smartphone, you can also use the “Authenticator” Firefox add-on or a desktop TOTP app like KeePassXC or Authenticator App for Linux.
Important: The two-factor authentication works with password-based SSH login. If you are using any private/public key SSH session, it will ignore two-factor authentication and log you in directly.