Setting up your first Linux server might feel overwhelming at first, especially if you’re new to server management. However, the process is much simpler than it seems, and with the right guidance, you can have your Ubuntu server up and running in no time.
In this step-by-step guide, I’ll walk you through the entire setup process, ensuring that your server is not only functional but also secure and optimized for future use.
Whether you’re setting up a web server, hosting applications, or just exploring Linux administration, this guide will help you get started quickly and confidently.
By the end of this tutorial, you’ll have a fully operational Ubuntu server that you can access remotely and customize to fit your needs.
Step 1: Choose a Cloud Provider or Install Locally (5 Minutes)
Before setting up your Ubuntu server, you need to decide where it will run. There are two main options: renting a cloud-based server (VPS) or installing Ubuntu Server on a physical machine. Your choice depends on your use case, budget, and experience level.
Option 1: Use a Cloud Server (Recommended for Beginners)
If you don’t have a spare computer or don’t want to deal with hardware setup, a cloud-based Virtual Private Server (VPS) is the easiest way to get started. Cloud providers offer pre-configured Ubuntu servers that you can deploy within minutes.
Here are some of the most popular and beginner-friendly cloud providers:
Steps to Deploy an Ubuntu VPS:
- Sign up for an account on your preferred cloud provider.
- Create a new server instance (often called a “droplet” on DigitalOcean or an “instance” on AWS).
- Choose Ubuntu 24.04 LTS, which is the latest Long-Term Support (LTS) version and has supported security updates for several years.
- Select a plan that fits your needs. If you’re just experimenting, a small instance with 1 CPU and 1GB RAM is enough.
- Set up authentication by choosing between a password or an SSH key (SSH keys are more secure and recommended).
- Launch the server and note down its IP address that you’ll need this to connect to it later.
That’s it! Your cloud-based Ubuntu server is now ready.
Option 2: Install Ubuntu Server on a Local Machine
If you have a spare computer or want to run Ubuntu on your personal hardware, you can install Ubuntu Server manually, which is ideal if you’re setting up a home lab, running a private web server, or experimenting with Linux administration.
What You’ll Need:
- A computer to install the Ubuntu Server on.
- A USB flash drive (at least 4GB).
- Another computer to create a bootable USB drive.
Steps to Install Ubuntu Server Locally:
- First, go to Ubuntu’s official website and download the latest Ubuntu Server 24.04 LTS ISO file.
- Next, create a bootable USB drive – if you’re on Windows, use Rufus to create a bootable USB:
- Insert your USB drive.
- Open Rufus and select the downloaded Ubuntu ISO.
- Click Start and wait for the process to complete.
- If you’re on Linux or macOS, you can use the dd command to create a bootable USB.
sudo dd if=ubuntu-24.04.1-live-server-amd64.iso of=/dev/sdX bs=4M status=progress
Replace /dev/sdX with the actual USB device path, which you can find using the lsblk command.
Now insert the USB drive into the target machine, restart the computer, and enter the BIOS/UEFI settings (usually by pressing F2, F12, DEL, or ESC during boot) and set the USB drive as the first boot device and save changes.
The Ubuntu Server installer will load.
Follow the Installation Steps:
- Choose your language and keyboard layout.
- Select Install Ubuntu Server.
- Set up a username and password.
- Choose your preferred disk partitioning method (Guided – Use Entire Disk is the simplest).
- Select whether to install OpenSSH Server (recommended if you plan to access your server remotely).
- Finish installation and reboot the machine.
Once the Ubuntu Server has been installed successfully, log in with the credentials you created during setup.
Which Option Should You Choose?
| Factor | Cloud Server (VPS) | Local Installation |
|---|---|---|
| Best for | Beginners, hosting websites, learning Linux remotely | Home labs, private servers, advanced users |
| Setup time | 5-10 minutes | 20-30 minutes |
| Hardware required | None | A spare PC or server |
| Access | Remotely via SSH | Direct login or SSH (if configured) |
| Cost | Monthly fee (~$5/month for basic VPS) | Free (except electricity and maintenance) |
| Performance | Depends on the chosen plan | Depends on your hardware |
If you’re new to Linux or want a hassle-free setup, a cloud-based VPS is the best choice. However, if you have an old PC and want full control over your hardware, installing Ubuntu Server locally is a great learning experience.
Now that you have your Ubuntu server set up, it’s time to access it and update the system to get the latest security patches.
sudo apt update && sudo apt upgrade -y
Step 2: Access Your Ubuntu Server (2 Minutes)
Now that your Ubuntu server is up and running, the next step is to access it, this is where you’ll start interacting with your server, installing software, and configuring it for your needs.
Accessing a Cloud Server (VPS)
If you deployed your Ubuntu server on a cloud platform like DigitalOcean, Linode, AWS, or Google Cloud, your provider will give you:
- A public IP address (e.g., 192.168.1.100).
- A default username (usually root or ubuntu).
- Either a password or an SSH key for authentication.
Connect to Your Ubuntu Server Using SSH
On Linux/macOS, you can run the following command in your terminal, replacing your-server-ip with your actual server’s IP address:
ssh ubuntu@your-server-ip
On Windows, you can use PuTTY client:
- Open PuTTY and in the Host Name (or IP address) field, enter your server’s IP address.
- Under Connection Type, select SSH and click Open.
- If using a password, enter it when prompted.
- If using an SSH key, load the private key in PuTTYgen before connecting.
If the login is successful, you’ll see a welcome message with system details.
Accessing a Local Ubuntu Server (Physical Machine)
If you installed Ubuntu Server on a local machine, power on the machine, wait for the login prompt, and enter the username and password you created during installation.
After logging in, you’ll be inside the Ubuntu command-line interface (CLI), ready to configure your server to get the latest security patches.
sudo apt update && sudo apt upgrade -y
Step 3: Create a New User and Secure SSH Access (5 minutes)
By default, most cloud providers give you a root user to log in to your server. While the root user has full control over the system, using it for daily tasks is risky because any accidental command or security breach could damage the entire system.
To improve security, let’s create a new user with administrative privileges and configure SSH access properly.
1. Create a New User
First, let’s add a new user who will handle server tasks instead of root and make sure to replace yourusername with your preferred username.
sudo adduser yourusername
The system will prompt you to set a password for the new user. Choose a strong password and confirm it. You’ll also see additional optional fields like full name and contact details. You can either fill them in or press Enter to skip.
2. Grant Administrative Privileges (sudo access)
Your new user should have administrative (sudo) privileges to run commands that require elevated permissions.
To add the user to the sudo group, run:
sudo usermod -aG sudo yourusername
Now switch to the new user and check if sudo works.
su - yourusername
sudo whoami
If the output is root, your user has sudo access.
3. Set Up SSH Key Authentication
Instead of logging in with a password, it’s much more secure to use SSH keys, which are like digital locks and keys that only allow authorized users to connect.
Generate an SSH Key
On your local computer (not the server), generate an SSH key pair by running.
ssh-keygen -t rsa -b 4096
Press Enter to save the key in the default location (~/.ssh/id_rsa). You can also set a passphrase for added security, but it’s optional.
Copy Your SSH Key to the Server
If you are using a cloud server, you can copy your SSH key to the server using:
ssh-copy-id yourusername@your-server-ip
If ssh-copy-id is not available, manually copy the public key (id_rsa.pub) and add it to the server:
ssh root@your-server-ip
sudo mkdir -p /home/yourusername/.ssh
sudo chmod 700 /home/yourusername/.ssh
echo "your-public-key" | sudo tee -a /home/yourusername/.ssh/authorized_keys > /dev/null
sudo chmod 600 /home/yourusername/.ssh/authorized_keys
sudo chown -R yourusername:yourusername /home/yourusername/.ssh
Log out of your current session and try logging in with the new user using SSH:
ssh yourusername@your-server-ip
If it works, you’ve successfully set up SSH key authentication!
4. Disable Root Login and Password Authentication
Now that you have a new user with SSH key authentication, let’s improve security by preventing root logins and disabling password authentication.
sudo nano /etc/ssh/sshd_config
Find the following lines and change their values.
PermitRootLogin no
PasswordAuthentication no
For the changes to take effect, restart the SSH service:
sudo systemctl restart ssh
Open a new terminal and try logging in using your new user. If everything works, you have now secured your SSH access and can safely manage your server.
Step 4: Install Essential Software (5 Minutes)
Now that your server is secured and ready, it’s time to install some essential software, which are useful to manage your server efficiently and keep it secure.
Install Common Packages
Ubuntu comes with a basic set of utilities, but you’ll need some additional packages for easier system administration.
sudo apt install -y vim curl wget git htop unzip net-tools
Here’s what each package does:
- vim – A powerful text editor (useful for editing configuration files).
- curl & wget – Command-line tools to download files from the web.
- git – Version control system, needed for managing code repositories.
- htop – A better alternative to the top for monitoring system resources.
- unzip – To extract .zip files.
- net-tools – Provides ifconfig and other network utilities (useful for networking tasks).
Set Up a UFW Firewall
A firewall is essential for securing your server against unauthorized access. Ubuntu includes UFW (Uncomplicated Firewall) by default, making it easy to manage firewall rules.
Since we are connected via SSH, we need to ensure that SSH traffic is allowed before enabling the firewall.
sudo ufw allow OpenSSH
sudo ufw enable
sudo ufw status
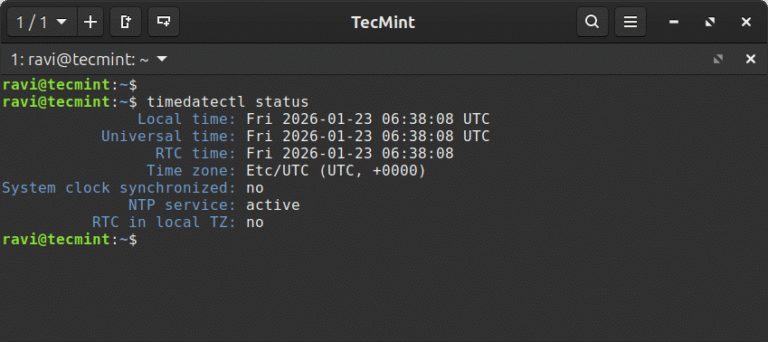
Configure Time and Synchronization
Keeping your server’s time accurate is important, especially for logs and scheduled tasks. Ubuntu comes with systemd-timesyncd, which synchronizes time automatically.
timedatectl
timedatectl list-timezones
sudo timedatectl set-timezone Asia/Kolkata
timedatectl
Now, your system will automatically sync time with internet time servers.
Install Fail2Ban (Optional, Extra Security)
Fail2Ban is a security tool that protects your server from brute-force attacks by blocking suspicious login attempts.
sudo apt install -y fail2ban
sudo systemctl enable fail2ban
sudo systemctl start fail2ban
sudo systemctl status fail2ban
This means Fail2Ban is active and protecting your server.
Enable Automatic Security Updates
Security patches are regularly released for Ubuntu, and it’s a good idea to enable automatic updates to keep your server secure.
sudo apt install -y unattended-upgrades
sudo dpkg-reconfigure --priority=low unattended-upgrades
cat /etc/apt/apt.conf.d/20auto-upgrades
You should see:
APT::Periodic::Update-Package-Lists "1";
APT::Periodic::Unattended-Upgrade "1";
This confirms that your server will automatically receive security updates.
Clean Up Unnecessary Files
After installing packages and updates, you may have unnecessary temporary files.
sudo apt autoremove -y
sudo apt autoclean
This removes unused dependencies and frees up disk space.
Step 5: Configure a Web Server (Optional, 5–10 minutes)
If you plan to host a website, web application, or even just test web-based services, you’ll need a web server.
The two most popular options on Linux are:
- Nginx (lightweight, fast, and great for handling high traffic).
- Apache (feature-rich and widely used).
For this guide, we’ll use Nginx since it’s modern, efficient, and beginner-friendly.
Install Nginx on Ubuntu
First, update your package list to ensure you get the latest version and install the Nginx package:
sudo apt update
sudo apt install -y nginx
nginx -v
Once installed, you need to start the Nginx service so it can begin serving web requests.
sudo systemctl start nginx
sudo systemctl enable nginx
sudo systemctl status nginx
Since we enabled UFW (Uncomplicated Firewall) earlier, we need to allow HTTP (port 80) and HTTPS (port 443) traffic.
sudo ufw allow 'Nginx Full'
sudo ufw status
At this point, Nginx should be running, you can test it, open your web browser, and enter your server’s IP address:
http://your-server-ip
If everything is working, you should see the default Nginx welcome page.
Set Up a Basic Website (Optional)
By default, Nginx serves web pages from the /var/www/html directory. You can replace the default page with your own custom website.
sudo nano /var/www/html/index.html
Delete any existing content and add this simple HTML code:
<!DOCTYPE html>
<html>
<head>
    <title>Welcome to My Server</title>
    <style>
        body { text-align: center; font-family: Arial, sans-serif; margin-top: 50px; }
        h1 { color: #4CAF50; }
    </style>
</head>
<body>
    <h1>Success! Your Nginx Web Server is Running.</h1>
    <p>This is a test page hosted on Ubuntu.</p>
</body>
</html>
Now, refresh your browser (http://your-server-ip), and you should see the custom web page instead of the default Nginx page.
Enable HTTPS Using a Free SSL
Now that your Nginx web server is running, you can enable HTTPS using a free SSL certificate from Let’s Encrypt:
sudo apt install -y certbot python3-certbot-nginx
sudo certbot --nginx
You have successfully installed and configured an Nginx web server on your Ubuntu server!
Conclusion
You’ve successfully set up your first Ubuntu server in under 30 minutes. While this guide covers the basics, there’s a lot more you can do with your server, such as hosting websites, setting up databases, or running applications.
As you gain experience, you’ll discover the power and flexibility of Linux servers. Happy hosting!