If you use a USB drive regularly on your Linux system, you might want it to automatically mount every time your computer starts up, which can save you time and effort, especially if you rely on the USB drive for daily tasks.
In this guide, we’ll walk you through the steps to make your USB drive mount automatically at boot on a Linux system.
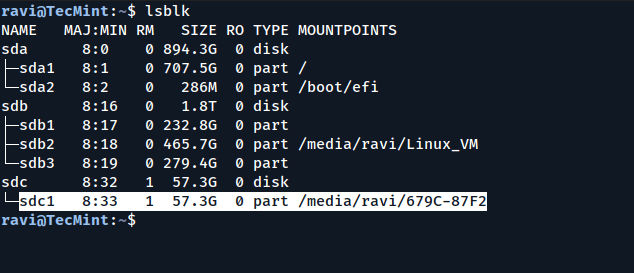
Step 1: Identify the USB Drive
First, you need to identify the USB drive and its partition by running the following lsblk command, which will list all the storage devices connected to your system:
lsblk
This command will display a list of all block devices. Look for your USB drive in the list, which will usually be labeled as something like /dev/sdb1 or /dev/sdc1, depending on how many drives are connected to your system.
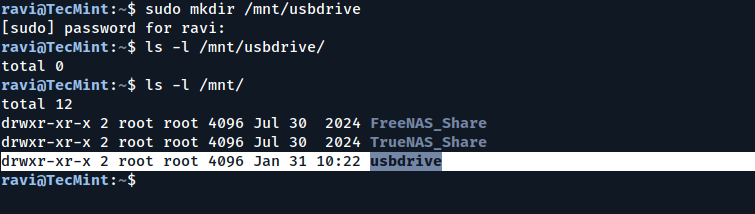
Step 2: Create a Mount Point
A mount point is a directory where the USB drive will be attached to your file system, so run the following mkdir command to create a mount point:
sudo mkdir /mnt/usbdrive
You can replace /mnt/usbdrive with any directory name you prefer.
Step 3: Find the UUID of the USB Drive
To ensure that the correct drive is mounted every time, we’ll use the UUID (Universally Unique Identifier) of the USB drive, which is a unique string that identifies the partition.
Run the following blkid command to find the UUID of your USB drive:
sudo blkid
Look for the line that corresponds to your USB drive, which will look something like this:
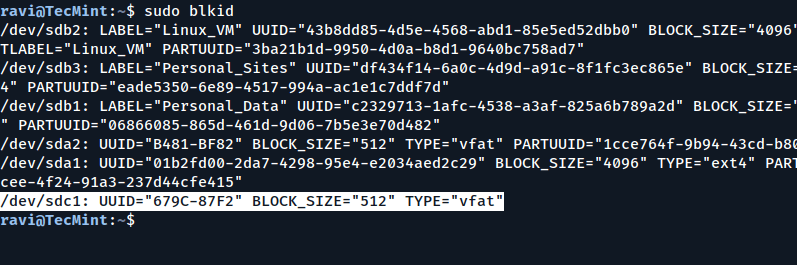
Copy the UUID (the part in quotes after UUID=), you’ll need it in the next step.
Step 4: Edit the /etc/fstab File
The /etc/fstab file contains information about disk partitions and how they should be mounted. We’ll add an entry for your USB drive so that it mounts automatically at boot.
Open the /etc/fstab file in a text editor with root privileges:
sudo nano /etc/fstab
Add the following line at the end of the file:
UUID=679C-87F2 /mnt/usbdrive vfat defaults 0 2
Replace 679C-87F2 with the UUID you copied earlier, and /mnt/usbdrive with the mount point you created. The vfat part is the file system type of your USB drive. If your USB drive uses a different file system (like ext4 or ntfs), replace vfat with the appropriate type.
Here’s a breakdown of the fields:
UUID=679C-87F2: The UUID of the USB drive./mnt/usbdrive: The mount point.vfat: The file system type.defaults: Mount options (default settings).0: Dump option (used for backups, usually set to 0).2: File system check order (0 means no check, 1 is for the root file system, 2 is for other file systems).
Save the file and exit the editor (in nano, press CTRL + X, then Y, and Enter).
Step 5: Test the Configuration
Finally, reboot your system to ensure that the USB drive mounts automatically at boot:
sudo reboot
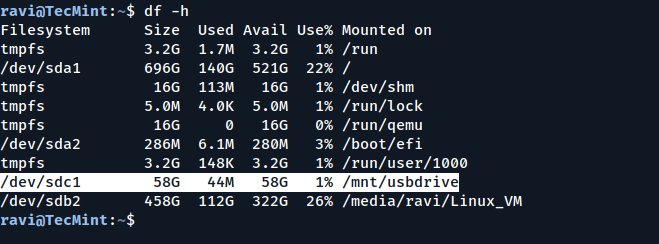
After the system restarts, check if the USB drive is mounted by running:
df -h
If everything is set up correctly, your USB drive should be listed and ready to use.
If the USB drive doesn’t mount automatically, check the system logs for errors:
sudo dmesg | grep mount
This command will show any errors related to mounting the USB drive.
Conclusion
By following these steps, you can ensure that your USB drive mounts automatically every time your Linux system boots up and saves you the hassle of manually mounting the drive each time you start your computer.
Remember to always back up important data before making changes to system files, and if you’re unsure about any step, consult the documentation or seek help from the community.
If you found this guide helpful, explore the related articles below for more tips and tricks on managing USB drives in Linux!